Wednesday, February 23, 2022

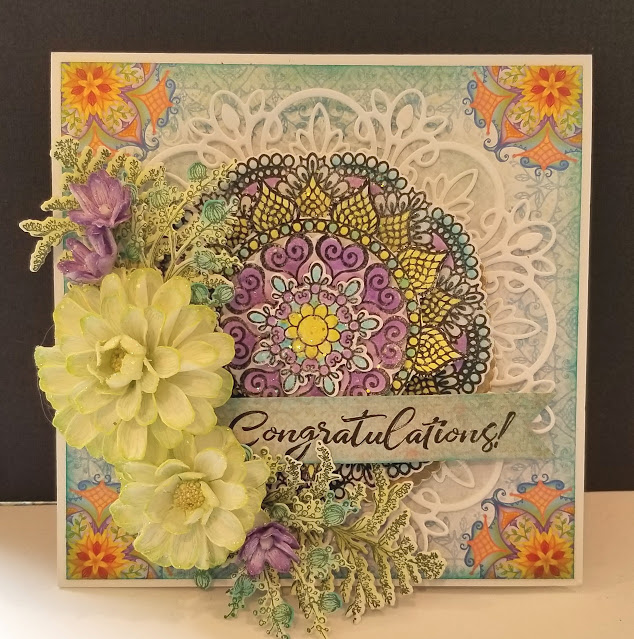
Congratulations Mosaic

 Howdy,

It's Inspiration Wednesday at Heartfelt Creations .  Join us on the Heartfelt Creations Blog today to see the design team inspiration.


Directions for the card:

Create a 6x6 card base with white cardstock. Cut a 5.5x5.5 piece of designer paper from the Elegant Mosaics Paper Collection, distress with Garden Patina and adhere to card front.  

Cut the large decorative die from the Simply Elegant Centerpiece Die in white card stock and adhere.

Stamp with the sentiment from the Celebrate Love Sentiments Cling Stamp Set in Jet Black on designer paper and cut out with the Arrows and Banner Die.

Stamp the fern from the Floral Shoppe Fillers Cling Stamp Set in Olive and sponge with Bamboo Leaves, cut out with coordinating die, sculpt with a stylus.

Stamp the sprig from the Wild Aster Spray Cling Stamp Set in Olive and sponge with Garden patina and Bamboo Leaves and cut out with coordinating die, sculpt with a stylus.

 Stamp the Elegant Mosaics Cling Stamp Set in Jet Black twice on white card stock, cut out the largest and second smallest die from one image with coordinating dies and cut out the third largest and smallest die on the other image. Color all of the parts of the image with Zig markers, cover with glitter and adhere each layer with foam tape.  Using Luxe Gold card stock, cut out the largest die to create a shadow and adhere offset under the mosaic.

 Stamp the Large and Small Garden Zinnia Cling Stamp Set in Vivid Chartreuse, cut out with coordinating dies and sponge the flowers with the same, sculpt with the 3D Zinnia Shaping Mold and add prills and glitter.

Stamp the flowers from the Fragrant Hyacinth Cling Stamp Set in Majestic Violet, cut out with coordinating dies and sponge with the same, sculpt with the 3D Hyacinth Shaping Mold and add a stamen and glitter.

Arrange and adhere flowers, ferns, sprigs and sentiment, as shown in photo.

Heartfelt Creations Supplies:

Elegant Mosaics Cling Stamp Set

Elegant Mosaics Die

Elegant Mosaics Paper Collection

Simply Elegant Centerpiece Die

Fragrant Hyacinth Cling Stamp Set

Fragrant Hyacinth Die

3D Hyacinth Shaping Mold

Floral Shoppe Fillers Cling Stamp Set

Wild Aster Spray Cling Stamp Set

Floral Shoppe Fillers Die

Large Garden Zinnia Cling Stamp Set

Large Garden Zinnia Die

Large 3D Zinnia Shaping Mold

Small Garden Zinnia Cling Stamp Set

Small Garden Zinnia Die

Small 3D Zinnia Die

Celebrate Love Sentiments Cling Stamp Set

Arrows and Banner Die

Deluxe Flower Shaping Kit

Stack and Store Daubers-Pack of 30

Deluxe Flower Shaping Paper Pack of 25 – White

Ranger Archival Ink – Jet Black

Ranger Archival Ink – Vivid Chartreuse

Ranger Archival Ink – Olive

Ranger Archival Ink – Garden Patina

Ranger Archival Ink – Majestic Violet

Memento Dye Inkpad – Lulu Lavender

Memento Dye Inkpad – Bamboo Leaves

Rajni Chawla's Crystal Clear

Designer Dries Clear Adhesive

Hydra Sponges

Pastel Bead Stamens – Medium

Zig Markers

Luxe Gold Cardstock

Embossing Powder – Gold

Spring Bling Prills – 12 Pack


Blessings,

Darla


Wednesday, February 16, 2022

Celebration Mosaic

        Hey there,

It's time for some design inspiration, join us today on the Heartfelt Creations Blog!


Directions for making this card:

Create a card base with the Ornate Flourish Gateway Die in white cardstock. Cut the large decorative die in yellow green designer paper from the Elegant Mosaics Paper Collection and adhere to card front.  Cut the center outline die in blue designer paper and adhere with foam tape.  Cut out the center decorative dies in Luxe Gold and white cardstock, adhere together offset to create a gold shadow.

Stamp the sentiment from the Celebrate Love Sentiments Cling Stamp Set in Jet Black on white cardstock and cut out with the Arrows and Banner Die.

Stamp the Floral Mosaics Cling Stamp Set twice with embossing ink and heat emboss with gold embossing powder.  Use the largest and second smallest coordinating dies to cut out the embossed design on one of the images and the third largest and smallest dies to cut out the design on the other image.  Color with Zig markers and adhere together with foam tape on each layer and adhere to card as shown in photo.

Stamp the border from the Floral Mosaics Cling Stamp in embossing ink and heat emboss in gold, cut out with coordinating die, adhere to the bottom of the card front.

Stamp the Sweet Magnolia Buds Cling Stamp Set in Rich Cocoa, cut out with coordinating dies and sponge with the Lulu Lavender, Majestic Violet, Bamboo Leaves and Rich Cocoa, sculpt with a stylus and add glitter.

Stamp the Sweet Magnolia Blooms Cling Stamp Set in Lulu Lavender, cut out with coordinating dies and sponge with the Bamboo Leaves and Lulu Lavender, sculpt with the 3D Magnolia Shaping Mold and add a stamens and glitter.

 Stamp the leaves from the Sweet Magnolia Cling Stamp Set in Bamboo Leaves, cut out with coordinating dies, sponge with Bamboo Leaves and Vivid Chartreuse and sculpt with the 3D Magnolia Shaping Mold.


Heartfelt Creations Supplies:

Bursting Bloom Mosaics Cling Stamp Set

Bursting Bloom Mosaics Die

Elegant Mosaics Paper Collection

Royal Elegance Frames Die

Sweet Magnolia Blooms Cling Stamp Set

Sweet Magnolia Blooms Die

3D Magnolia Shaping Mold

Sweet Magnolia Buds Cling Stamp Set

Sweet Magnolia Buds Die

Ornate Flourish Gateway Die

Celebrate Love Sentiments Cling Stamp Set

Arrows and Banner Die

Deluxe Flower Shaping Kit

Stack and Store Daubers-Pack of 30

Deluxe Flower Shaping Paper Pack of 25 – White

Ranger Archival Ink – Jet Black

Ranger Archival Ink – Vivid Chartreuse

Ranger Archival Ink – Majestic Violet

Memento Dye Inkpad – Lulu Lavender

Memento Dye Inkpad – Bamboo Leaves

Memento Dye Inkpad – Rich Cocoa

Rajni Chawla's Crystal Clear

Designer Dries Clear Adhesive

Hydra Sponges

Pastel Bead Stamens – Medium

Zig Markers

Luxe Gold Cardstock

Embossing Powder – Gold


Blessings,

Darla

Wednesday, February 9, 2022

Lovely Mosaic

 Hi!

It's release day at Heartfelt Creations, join us on the Heartfelt Creations Blog to celebrate the new Elegant Mosaics Collection.

These new Mosaics are so versitile, here I've paired it with florals and background dies.

Create a 5x7 card base with white cardstock. Cut a 4.75x6.75 piece of teal designer paper from the Elegant Mosaics Paper Collection, distress with Garden Patina and adhere to card front.  

Cut the large die from the Royal Elegance Frames Die in white card stock and adhere, cut the center die in Luxe Gold card stock and adhere with foam tape.

Stamp with the sentiment from the Cheerful Note Sentiments Cling Stamp Set in Jet Black on white cardstock and cut out with the Arrows and Banner Die.

Stamp the Floral Mosaics Cling Stamp Set once in Garden Patina and cut out with largest coordinating die and sponge with same. Stamp once in Vivid Chartreuse, cut out with middle die and sponge with same, and stamp once with embossing ink and heat emboss with gold embossing powder, cut with smallest die and color with Zig marker. Adhere in order with foam tape on each layer.

Stamp the Large and Small Garden Zinnia Cling Stamp Set in Vivid Chartreuse, cut out with coordinating dies and sponge the flowers with the same, sculpt with the 3D Zinnia Shaping Mold and add prills and glitter.

Stamp the Sweet Magnolia Blooms Cling Stamp Set in Lulu Lavender, cut out with coordinating dies and sponge with the same, sculpt with the 3D Magnolia Shaping Mold and add a stamen and glitter.

 Stamp the Leafy Accents Cling Stamp Set in Olive, cut out with coordinating dies, sponge with Olive and Lulu Lavender and sculpt with the 3D Leafy Accents Shaping Mold.

Arrange and adhere flowers, leaves and sentiment, as shown in photo.


Heartfelt Creations Supplies:

Floral Mosaics Cling Stamp Set

Floral Mosaics Die

Elegant Mosaics Paper Collection

Royal Elegance Frames Die

Sweet Magnolia Blooms Cling Stamp Set

Sweet Magnolia Blooms Die

3D Magnolia Shaping Mold

Large Garden Zinnia Cling Stamp Set

Large Garden Zinnia Die

Large 3D Zinnia Shaping Mold

Small Garden Zinnia Cling Stamp Set

Small Garden Zinnia Die

Small 3D Zinnia Die

Leafy Accents Cling Stamp Set

Leafy Accents Die

3D Leafy Accents Shaping Mold

Cheerful Note Sentiments Cling Stamp Set

Arrows and Banner Die

Deluxe Flower Shaping Kit

Stack and Store Daubers-Pack of 30

Deluxe Flower Shaping Paper Pack of 25 – White

Ranger Archival Ink – Jet Black

Ranger Archival Ink – Vivid Chartreuse

Ranger Archival Ink – Olive

Ranger Archival Ink – Garden Patina

Memento Dye Inkpad – Lulu Lavender

Rajni Chawla's Crystal Clear

Designer Dries Clear Adhesive

Hydra Sponges

Pastel Bead Stamens – Medium

Zig Markers

Luxe Gold Cardstock

Embossing Powder – Gold

Spring Bling Prills – 12 Pack


Blessings,

Darla
Wednesday, February 2, 2022

Oval Floral Frame


Hey there, it's time for Inspiration Wednesday on the Heartfelt Creations Blog, join us there today to see what's new.


For my card today, I combined the flowers from the Curvy Floral Frame Cling Stamp Set and the frame of the Oval Floral Frame Cling Stamp Set.


Create a 6x6 card base with white cardstock. Cut a 5.5x5.5 piece of designer paper from the Floral Frames Paper Collection, distress with Fern Green and adhere to card front.  

 Cut the Elegant Hearts Centerpiece Die in white cardstock and adhere to card front.

Stamp the Oval Floral Frame Cling Stamp Set in Jet Black on Bristol Smooth Cardstock, cut out with coordinating dies, and color with Zig markers.  Cut out again in Luxe Gold Card stock and adhere them offset, to create a gold shadow, add glitter to flowers and adhere to card front.

Stamp the sentiment from the Oval Floral Frames Cling Stamp Set in Jet Black and cut out with coordinating die, cut out an additional die in Luxe Gold cardstock, adhere together offset to create a shadow. Cut out the tag from the paper collection with the Album Tags and Accents Die and adhere sentiment, cut out additional tag in Luxe Gold and adhere offset.  Adhere to right side of oval frame as shown in photo and adhere metallic brad stickers to cover holes in tag.

Stamp the flowers from the Curvy Floral Frame Cling Stamp Set in Coastal Coral, cut out with coordinating dies and sponge with Coastal Coral and Bright Tangelo, sponge the leaves with Fern Green, sculpt with the 3D Floral Basics Shaping Mold and add stamens and glitter.

Arrange and adhere flowers and leaves as shown in photo.


Heartfelt Creations Supplies:

Curvy Floral Frame Cling Stamp Set

Curvy Floral Frame Die

Floral Frames Paper Collection

3D Floral Basics Shaping Mold

Oval Floral Frame Cling Stamp Set

Oval Floral Frame Die

Elegant Hearts Centerpiece Die

Album Tags and Accents Die

Deluxe Flower Shaping Kit

Stack and Store Daubers-Pack of 30

Deluxe Flower Shaping Paper Pack of 25 – White

Ranger Archival Ink – Jet Black

Ranger Archival Ink – Coastal Coral

Ranger Archival Ink – Fern Green

Memento Dye Ink Pad – Bright Tangelo

Rajni Chawla's Crystal Clear

Designer Dries Clear Adhesive

Hydra Sponges

Zig Markers

Pastel Bead Stamens - Medium

Luxe Gold Cardstock

Other Supplies: White Cardstock, Bristol Smooth Cardstock, metal brad stickers


Blessings, 

Darla