Wednesday, December 28, 2022

Basket of Hugs


Hi Friends,

It's time for Inspiration Wednesday on the Heartfelt Creations Blog, join us today to see what the design team has created.

Instructions for Card:

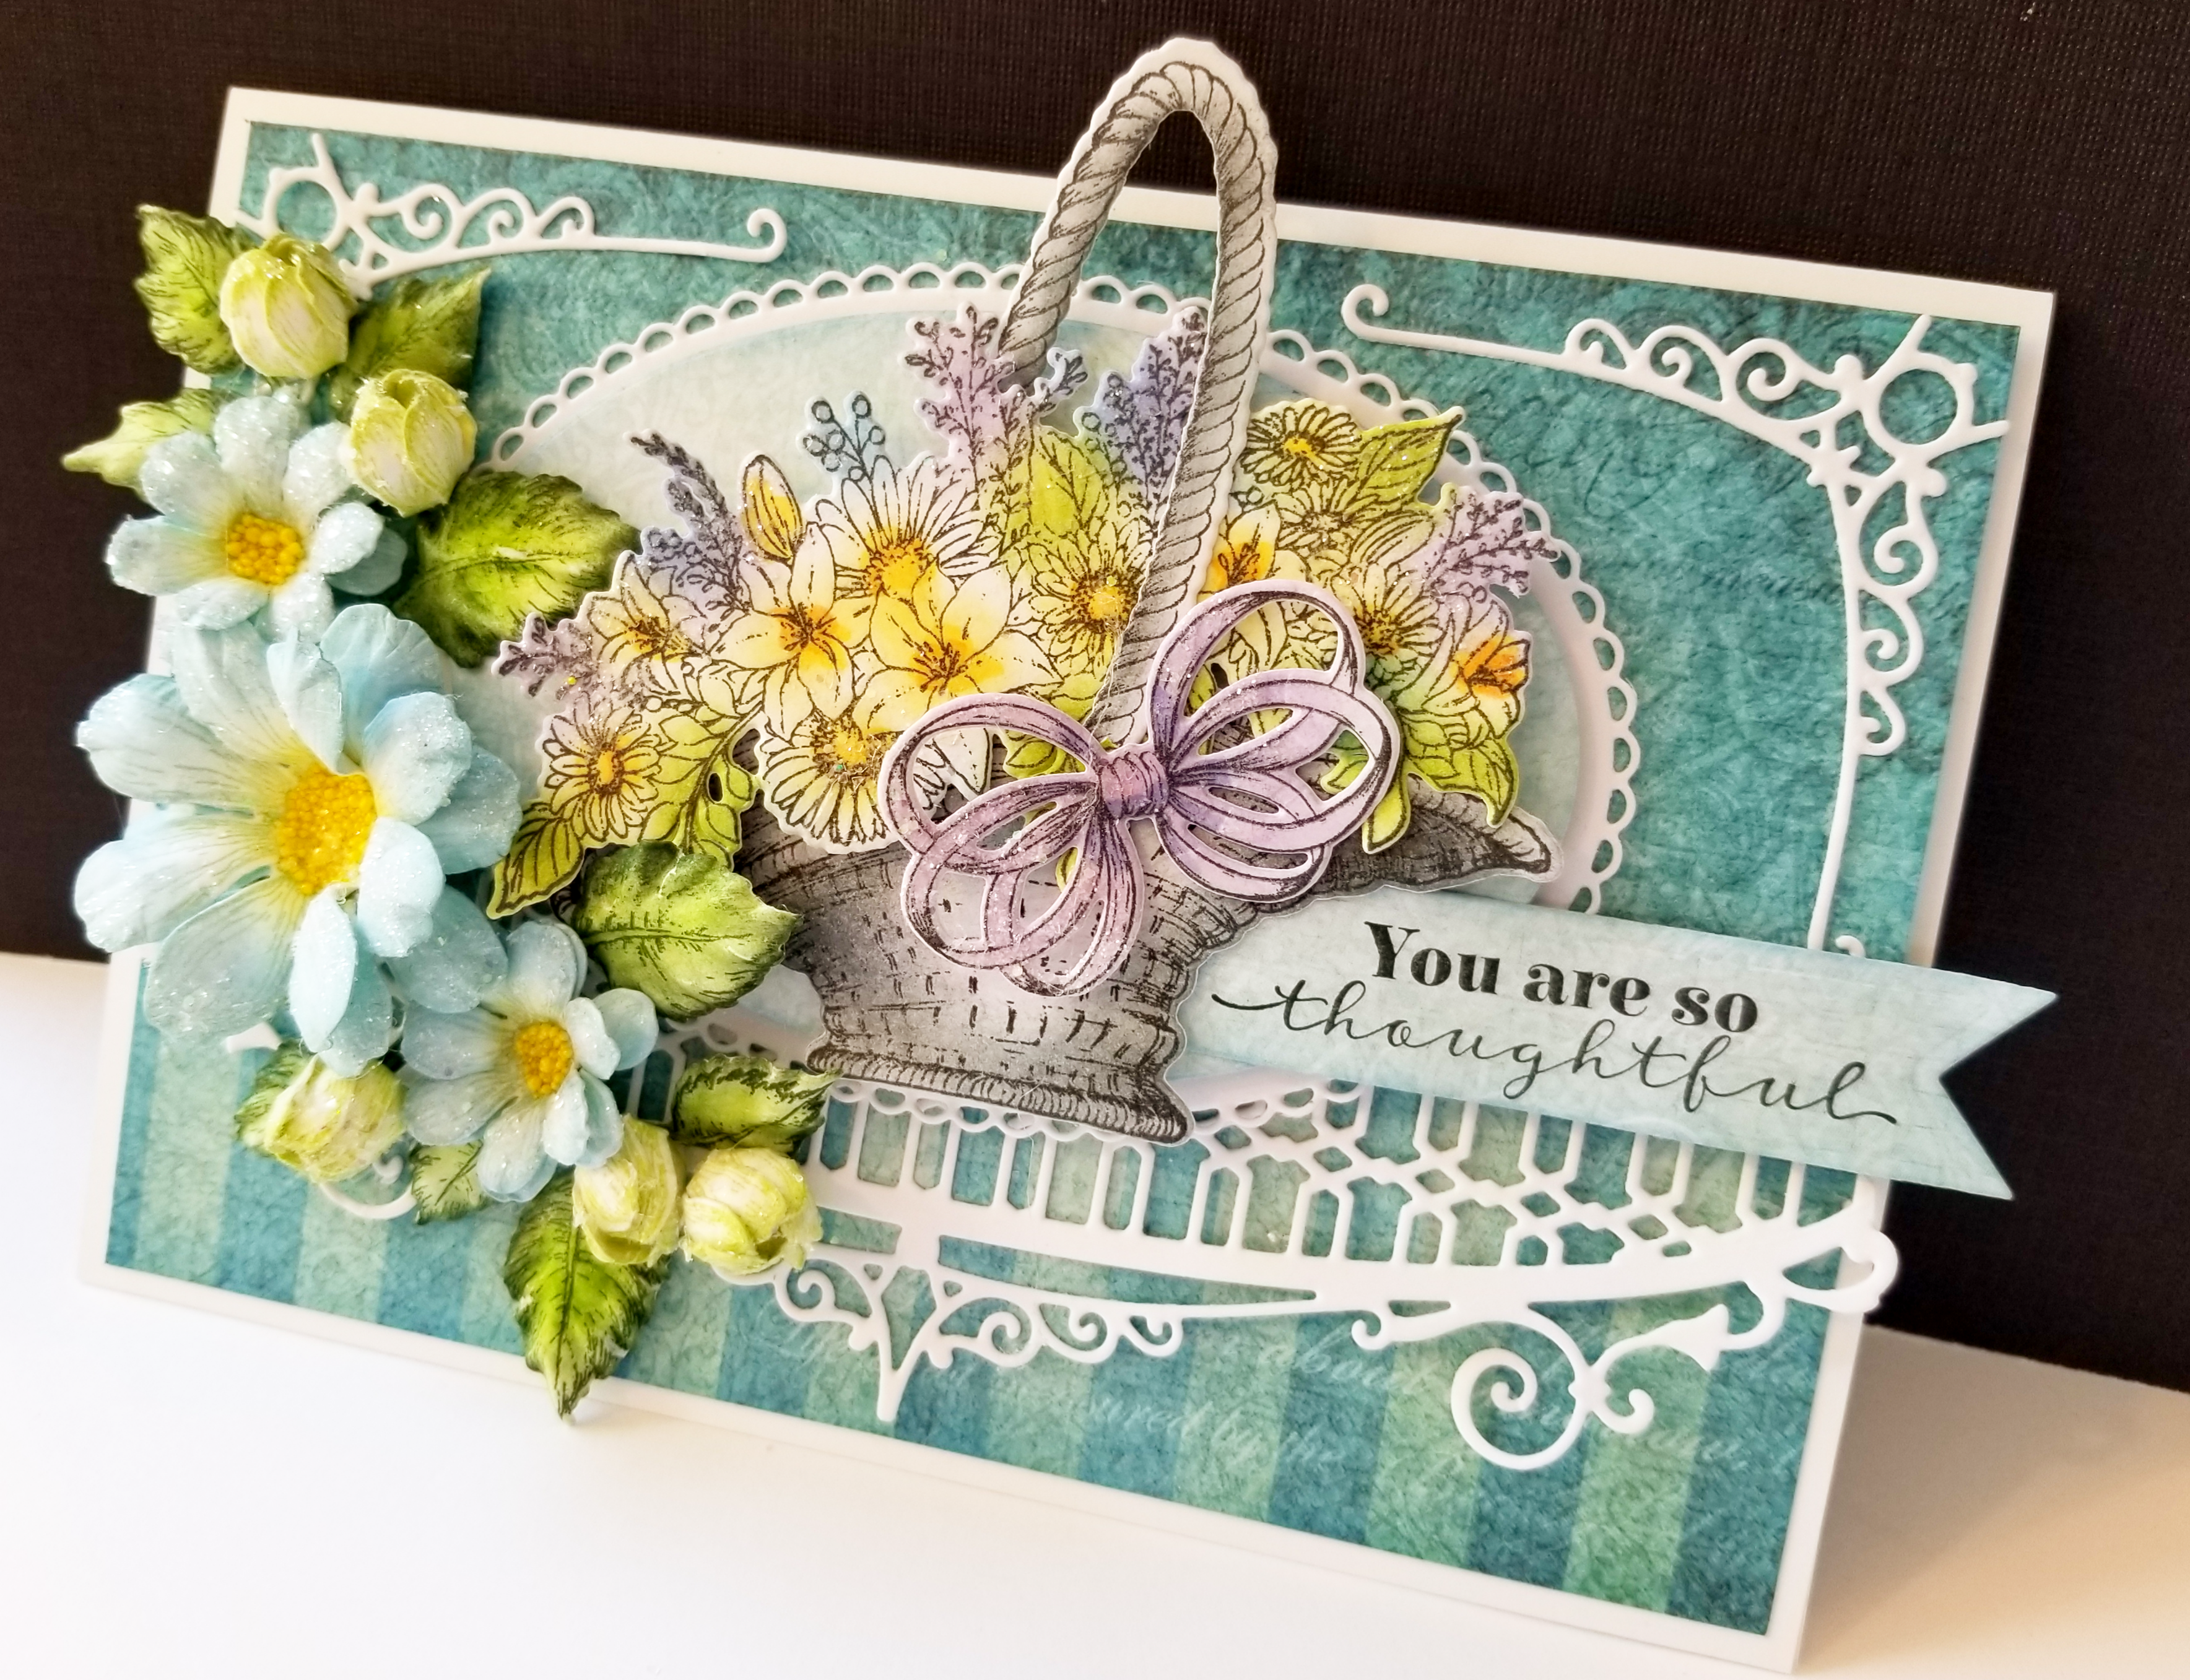
Create a 5x7 card base in white cardstock.  Cut out a 4.75x6.75 piece of teal striped paper from the Floral Basket Paper Collection and adhere to card. 

Cut out the Oval Filigree Frame Die in white cardstock and adhere.  Cut out the inside circle in light blue designer paper, distress with French Ultramarine and adhere with foam tape. Cut out the middle die in white cardstock and adhere with foam tape.  Cut out the smaller die in light green designer paper and adhere.

Stamp the sentiment from the Friendship Sentiments Cling Stamp Set in Jet Black on white cardstock and cut out with the Eyelet Circle and Basics Small Die.  Cut out the smallest die from the Decorative Circle Frames Die in light blue designer paper, distress with French Ultramarine and adhere to sentiment with foam tape.

Stamp the basket and handle from the Wicker Basket Cling Stamp Set in Jet Black, sponge the basket and handle with Pebble Beach, cut out with coordinating dies and adhere with foam tape on the oval.  Adhere the sentiment as shown in photo.

Stamp the small zinnias from the Large Garden Zinnia Cling Stamp Set in French Ultramarine, sponge with Sunflower and French Ultramarine, cut out with coordinating dies and sculpt with the Large 3D Zinnia Rose Shaping Mold, add prills and glitter.

Stamp the small zinnias from the Large Garden Zinnia Cling Stamp Set in Leaf Green, cut out with coordinating dies and sculpt with the Large 3D Zinnia Rose Shaping Mold, sculpt into buds and add glitter.

Stamp the small zinnia from the Small Garden Zinnia Cling Stamp Set in French Ultramarine, sponge with Sunflower and French Ultramarine, cut out with coordinating dies and sculpt with the Small 3D Zinnia Rose Shaping Mold, add prills and glitter.

Stamp the leaves from the Leafy Accents Cling Stamp Set in Olive, cut out with coordinating dies, sponge with Leaf Green, sculpt with 3D Leafy Accents Shaping Mold.

Adhere flowers and foliage as shown in photo.  
Heartfelt Creations Supplies:

Wicker Basket Die

Wicker Basket Cling Stamp Set

Floral Basket Paper Collection

Large Garden Zinnia Cling Stamp Set

Large Garden Zinnia Die

Large 3D Zinnia Rose Shaping Mold

Small Garden Zinnia Cling Stamp Set

Small Garden Zinnia Die

Small 3D Zinnia Rose Shaping Mold

Leafy Accents Cling Stamp Set

Leafy Accents Die

3D Leafy Accents Shaping Mold

Friendship Sentiments Cling Stamp Set

Decorative Circle Frames Die

Oval Filigree Frame Die

Eyelet Circle and Basics Small Die

Adhesive Foam Strips

Deluxe Flower Shaping Kit

Stack and Store Daubers-Pack of 30

Deluxe Flower Shaping Paper Pack of 25 – White

Ranger Archival Ink – Jet Black

Ranger Archival Ink – Olive

Ranger Archival Ink – Sunflower

Ranger Archival Ink – Leaf Green

Ranger Archival Ink – French Ultramarine

Ranger Archival Ink – Pebble Beach

Rajni Chawla's Crystal Clear

Designer Dries Clear Adhesive

Hydra Sponges

Bright Ideas Prills – 12 Pack

Blessings,

Darla

Wednesday, December 21, 2022

Lily Basket

 Howdy,

I'm so excited to bring you another project made with the Floral Basket Collection! Join the design team today on the Heartfelt Creations Blog to see more projects!


Instructions for Card:

Create a 5x7 card base in white cardstock.  Cut out a 2x6.75 piece of teal striped paper from the Floral Basket Paper Collection and adhere to bottom of card.  Cut out the Filigree Accents Die in white cardstock and adhere on striped paper, as shown in photo.  Cut out a 3x6.75 piece of teal paper from the paper collection and adhere with foam tape.

Cut out the corners from the Filigree Border & Accents Die x2 and adhere to each top corner.

Cut out the scalloped oval from the Eyelet Oval and Basics Large Die in white cardstock and adhere, cut out the oval from the Eyelet Oval and Basics Large Die in light blue and distress with Summer Sky, adhere with foam tape, as shown in photo.

Stamp the sentiment from the Just for You Sentiments Cling Stamp Set in Jet Black on light blue designer paper and cut out the with the Arrows and Banner Die.

Stamp the basket, bow and handle from the Wicker Basket Cling Stamp Set, and the floral from the Basket Blooms Cling Stamp Set in Jet Black. Sponge the basket and handle with Pebble Beach, cut out with coordinating dies and adhere with foam tape on the oval. Sponge the florals with Sunflower, Summer Sky, Leaf Green, Vibrant Violet, add accents with Zig Markers, cut out with coordinating dies, add glitter and adhere with foam tape.  Sponge bow with Vibrant Violet, cut out with coordinating die, add glitter and adhere with foam tape as shown in photo.  Adhere the sentiment as shown in photo.

Stamp the small zinnias from the Large Garden Zinnia Cling Stamp Set in French Ultramarine, sponge with Sunflower and French Ultramarine, cut out with coordinating dies and sculpt with the Large 3D Zinnia Rose Shaping Mold, add prills and glitter.

Stamp the small zinnias from the Large Garden Zinnia Cling Stamp Set in Leaf Green, cut out with coordinating dies and sculpt with the Large 3D Zinnia Rose Shaping Mold, sculpt into buds and add glitter.

Stamp the medium zinnia from the Small Garden Zinnia Cling Stamp Set in French Ultramarine, sponge with Sunflower and French Ultramarine, cut out with coordinating dies and sculpt with the Small 3D Zinnia Rose Shaping Mold, add prills and glitter.

Stamp the leaves from the Leafy Accents Cling Stamp Set in Olive, cut out with coordinating dies, sponge with Leaf Green, sculpt with 3D Leafy Accents Shaping Mold.

Adhere flowers and foliage as shown in photo.  

Heartfelt Creations Supplies:

Wicker Basket Die

Basket Blooms Florals Die

Wicker Basket Cling Stamp Set

Basket Blooms Cling Stamp Set

Floral Basket Paper Collection

Large Garden Zinnia Cling Stamp Set

Large Garden Zinnia Die

Large 3D Zinnia Rose Shaping Mold

Small Garden Zinnia Cling Stamp Set

Small Garden Zinnia Die

Small 3D Zinnia Rose Shaping Mold

Leafy Accents Cling Stamp Set

Leafy Accents Die

3D Leafy Accents Shaping Mold

Just for You Sentiments Cling Stamp Set

Arrows and Banner Die

Eyelet Oval and Basics Large Die

Filigree Accents Die

Filigree Border & Accents Die

Adhesive Foam Strips

Deluxe Flower Shaping Kit

Stack and Store Daubers-Pack of 30

Deluxe Flower Shaping Paper Pack of 25 – White

Ranger Archival Ink – Jet Black

Ranger Archival Ink – Olive

Ranger Archival Ink – Leaf Green

Ranger Archival Ink – Sunflower

Ranger Archival Ink – French Ultramarine

Stazon Ink Pad – Vibrant Violet

Memento Dye Ink – Summer Sky

Ranger Archival Ink – Pebble Beach

Rajni Chawla's Crystal Clear

Designer Dries Clear Adhesive

Hydra Sponges

Zig Markers

Bright Ideas Prills – 12 Pack

Blessings,

Darla

Wednesday, December 14, 2022

Rose Basket

 Hi All,

It's time for the Heartfelt Creations Release of the gorgeous Floral Basket Collection! Join us today on the Heartfelt Creations Blog to our projects.


Instructions for Card:

Create a 6x6 card base in white cardstock.  Cut out a 5.75x5.75 piece of light blue paper from the Floral Basket Paper Collection and adhere. Cut out the 6x6 striped frame from the paper collection, cut off the outer part of panel and adhere frame with foam tape.

Cut out the Decorative Circle Frames Die in white cardstock and adhere to card front with foam tape.  Cut out the largest scalloped circle die from this set in light blue paper and adhere with foam tape.

Stamp the basket, bow and handle from the Wicker Basket Cling Stamp Set, and the florals (x2) and roses (x3) from the Basket Florals Cling Stamp Set in Jet Black. Sponge the basket and handle with Rich Cocoa, cut out with coordinating dies and adhere with foam tape. Sponge the florals with Sunflower, Summer Sky, Leaf Green, Vibrant Violet, add accents with Zig Markers, cut out with coordinating dies, cut out the extra 3 rose piece and adhere with foam tape to give extra dimension to floral piece, add glitter and adhere with foam tape.  Sponge bow with French Ultramarine, cut out with coordinating die, add glitter and adhere with foam tape as shown in photo

Stamp the small zinnias from the Large Garden Zinnia Cling Stamp Set in French Ultramarine, sponge with Sunflower and French Ultramarine, cut out with coordinating dies and sculpt with the Large 3D Zinnia Rose Shaping Mold, add prills and glitter.

Stamp the leaves from the Leafy Accents Cling Stamp Set in Olive, cut out with coordinating dies, sponge with Leaf Green, sculpt with 3D Leafy Accents Shaping Mold.

Adhere flowers and foliage as shown in photo.  
Heartfelt Creations Supplies:

Wicker Basket Die

Basket Florals Die

Wicker Basket Cling Stamp Set

Basket Florals Cling Stamp Set

Floral Basket Paper Collection

Large Garden Zinnia Cling Stamp Set

Large Garden Zinnia Die

Large 3D Zinnia Rose Shaping Mold

Leafy Accents Cling Stamp Set

Leafy Accents Die

3D Leafy Accents Shaping Mold

Decorative Circle Frames Die

Adhesive Foam Strips

Deluxe Flower Shaping Kit

Stack and Store Daubers-Pack of 30

Deluxe Flower Shaping Paper Pack of 25 – White

Ranger Archival Ink – Jet Black

Ranger Archival Ink – Olive

Ranger Archival Ink – Leaf Green

Ranger Archival Ink – Sunflower

Ranger Archival Ink – French Ultramarine

Stazon Ink Pad – Vibrant Violet

Memento Dye Ink – Summer Sky

Memento Dye Ink – Rich Cocoa

Rajni Chawla's Crystal Clear

Designer Dries Clear Adhesive

Hydra Sponges

Zig Markers

Bright Ideas Prills – 12 Pack

Blessings,

Darla

Wednesday, December 7, 2022

Black Lace Roses


Hi!

It's time for Inspiration Day on the Heartfelt Creations Blog, join the Design Team to see their creations.

Instructions for Card:

Create a 5x7 card base in white cardstock.  Cut out a 4.5x6.5 piece of peach paper from the Friendship Rose Paper Collection, distress with Coastal Coral and adhere.  Cut out the Decorative Heart Die in black cardstock and adhere.

Cut out the center scalloped heart die with the Decorative Heart Die in peach designer paper and adhere to card front offset. 

Stamp the roses from the Friendship Rose Heart Cling Stamp Set in embossing ink and heat emboss with black embossing powder, color with Zig Markers and cut out with coordinating dies, adhere on the right side of the heart with foam tape, as shown in photo.

Stamp the roses from the Classic Rose Cling Stamp Set in Coastal Coral, sponge with Coastal Coral, Bright Tangelo and Sunflower, cut out with coordinating dies and sculpt with the 3D Rose Shaping Mold, add glitter.

Stamp the leaves from the Leafy Accents Cling Stamp Set in Olive, cut out with coordinating dies, sponge with Olive and Vibrant Fuchsia, sculpt with 3D Leafy Accents Shaping Mold.

Adhere flowers and foliage as shown in photo.  
Heartfelt Creations Supplies:

Friendship Rose Heart Die

Decorative Heart Die

Friendship Rose Heart Cling Stamp Set

Friendship Rose Paper Collection

Classic Rose Cling Stamp Set

Classic Rose Die

3D Rose Shaping Mold

Leafy Accents Cling Stamp Set

Leafy Accents Die

3D Leafy Accents Shaping Mold

Adhesive Foam Strips

Deluxe Flower Shaping Kit

Stack and Store Daubers-Pack of 30

Deluxe Flower Shaping Paper Pack of 25 – White

Ranger Archival Ink – Jet Black

Ranger Archival Ink – Olive

Ranger Archival Ink – Coastal Coral

Ranger Archival Ink – Sunflower

Ranger Archival Ink – Bright Tangelo

Ranger Archival Ink – Vibrant Fuchsia

Rajni Chawla's Crystal Clear

Designer Dries Clear Adhesive

Hydra Sponges

Zig Markers

Other Supplies:  White Cardstock, black embossing powder, embossing ink


Blessings,

Darla

Wednesday, November 30, 2022

One in a Million

 Howdy Friends, 

It's inspiration day on the Heartfelt Creations Blog, join us today to see what the design team has created and some special Cyber Monday projects.


Instructions for Card:

Create a 5x7 card base in white cardstock.  Cut out a 4.5x6.5 piece of dark pink paper from the Friendship Rose Paper Collection and adhere.  Cut out the Decorative Heart Die twice in white cardstock and twice in pale pink paper from the paper collection, cut off the bottoms, adhere pink and white offset to create a shadow.  Adhere one to the right side of the card and adhere to other to the left side of a 5x4 piece of peach paper distressed with Coastal Coral and adhered to the left side with foam tape, as shown in photo.

Cut out the center scalloped heart die from the Decorative Heart Die in peach designer paper and adhere to card front offset. 

Stamp the heart and roses from the Budding Rose Heart Cling Stamp Set in embossing ink and heat emboss with black embossing powder, color with Zig Markers and cut out with coordinating dies, adhere heart offset to heart die, as shown in photo.

Stamp sentiment from the Friendship Sentiments Cling Stamp Set in Jet Black on pink paper from the paper collection, cut out with the inner heart from the Decorative Heart Die, distress with Coastal Coral, cut out an additional heart in dark pink and offset with foam tape, adhere the two with foam tape to the right side of heart, as shown in photo.

Stamp the roses from the Classic Rose Cling Stamp Set in Bright Tangelo, sponge with Coastal Coral, Bright Tangelo and Sunflower, cut out with coordinating dies and sculpt with the 3D Rose Shaping Mold, add glitter.

Stamp the leaves from the Leafy Accents Cling Stamp Set in Olive, cut out with coordinating dies, sponge with Olive and Vibrant Fuchsia, sculpt with 3D Leafy Accents Shaping Mold.

Adhere flowers, stems from Budding Rose Heart Cling Stamp Set and foliage as shown in photo.  
Supplies for Card:

Budding Rose Heart Die

Decorative Heart Die

Budding Rose Heart Cling Stamp Set

Friendship Sentiments Cling Stamp Set

Friendship Rose Paper Collection

Classic Rose Cling Stamp Set

Classic Rose Die

3D Rose Shaping Mold

Leafy Accents Cling Stamp Set

Leafy Accents Die

3D Leafy Accents Shaping Mold

Adhesive Foam Strips

Deluxe Flower Shaping Kit

Stack and Store Daubers-Pack of 30

Deluxe Flower Shaping Paper Pack of 25 – White

Ranger Archival Ink – Jet Black

Ranger Archival Ink – Olive

Ranger Archival Ink – Coastal Coral

Ranger Archival Ink – Vibrant Fuchsia

Ranger Archival Ink – Sunflower

Ranger Archival Ink – Bright Tangelo

Rajni Chawla's Crystal Clear

Designer Dries Clear Adhesive

Hydra Sponges

Zig Markers

Other Supplies: White Cardstock, black embossing powder, embossing ink


Blessings,

Darla

Friday, November 25, 2022

Rose Hugs

 It's Black Friday in the United States and we have a special release just for you today at Heartfelt Creations, the long awaited release of the Slim Rectangle and Border Dies.  Join us on the Heartfelt Creations Blog to see the collection.

Instructions for card:

Create a 4.25x9.75 card base in white cardstock.  Cut out the large Slim Eyelet Rectangle Die in black cardstock and adhere, cut out the Slim Basic Rectangle Die in dark pink pattern paper from the Friendship Rose Paper Collection and adhere. Cut out the Slim Lattice Oval Die in the lightest pink paper from the paper collection and the Slim Basic Rectangle Die in darker pink and adhere behind, adhere with foam tape to card.  Cut out the center of the Slim Lattice Oval Die in rose pattern paper and adhere as shown in photo.

Stamp the sentiment from the Friendship Sentiments Cling Stamp Set on white cardstock in Jet Black and cut out with the center of the Slim Lattice Oval Die, distress with Coastal Coral, use this same die to cut out the decorative piece in black cardstock. Adhere as shown in photo with foam tape.

Stamp the roses from the Friendship Rose Heart Cling Stamp Set in embossing ink and heat emboss with black embossing powder, cut out with coordinating dies and color with Zig markers. Adhere with foam tape as shown in photo,

Tie seam binding bow and adhere on roses. 

Heartfelt Creations Supplies:

Slim Eyelet Rectangle Die

Slim Basic Rectangle Die

Slim Lattice Oval Die

Friendship Rose Heart Die

Friendship Rose Heart Cling Stamp Set

Friendship Sentiments Cling Stamp Set

Friendship Rose Paper Collection

Adhesive Foam Strips

Deluxe Flower Shaping Kit

Stack and Store Daubers-Pack of 30

Deluxe Flower Shaping Paper Pack of 25 – White

Ranger Archival Ink – Jet Black

Ranger Archival Ink – Coastal Coral

Rajni Chawla's Crystal Clear

Designer Dries Clear Adhesive

Hydra Sponges

Zig markers

Other Supplies: White Cardstock, black cardstock, embossing ink, black embossing powder, seam binding ribbon


Blessings,

Darla

Wednesday, November 16, 2022

In My Heart

 Howdy,

It's time for inspiration day on the Heartfelt Creations Blog, join the design team to see their beautiful creations!


Instructions for Card:

Create a 5x7 card base in white cardstock.  Cut out a 4.5x6.5 peach piece of paper from the Friendship Rose Paper Collection, distress with Coastal Coral, cut out a plum piece of designer paper, slightly bigger and adhere together.  Adhere to card front.

Cut out the Decorative Heart Die twice in white card stock, sponge the edges of one with Coastal Coral and adhere offset as shown in photo.

Cut out the center scalloped heart die from the Decorative Heart Die in peach designer paper and plum and adhere offset with foam tape.  Cut out the center heart in rose paper and adhere.

Stamp the sentiment from the Friendship Sentiments Cling Stamp Set on peach paper and cut out with the center heart of the Decorative Heart Die, distress with Coastal Coral, adhere with foam tape, offset as shown in photo.

Stamp the roses from the Classic Rose Cling Stamp Set in Vibrant Fuchsia, sponge with same, cut out with coordinating dies and sculpt with the 3D Rose Shaping Mold, add glitter.

Stamp the leaves from the Leafy Accents Cling Stamp Set in Olive, cut out with coordinating dies, sponge with Olive and Vibrant Fuchsia, sculpt with 3D Leafy Accents Shaping Mold.

Adhere flowers and foliage as shown in photo.  
Heartfelt Creations Supplies:

Friendship Sentiments Cling Stamp Set

Decorative Heart Die

Friendship Rose Paper Collection

Classic Rose Cling Stamp Set

Classic Rose Die

3D Rose Shaping Mold

Leafy Accents Cling Stamp Set

Leafy Accents Die

3D Leafy Accents Shaping Mold

Adhesive Foam Strips

Deluxe Flower Shaping Kit

Stack and Store Daubers-Pack of 30

Deluxe Flower Shaping Paper Pack of 25 – White

Ranger Archival Ink – Jet Black

Ranger Archival Ink – Olive

Ranger Archival Ink – Coastal Coral

Ranger Archival Ink – Vibrant Fuchsia

Rajni Chawla's Crystal Clear

Designer Dries Clear Adhesive

Hydra Sponges


Blessings,

Darla

Wednesday, November 9, 2022

Rose Heart

 Hi All,

It's time for the Heartfelt Creations Release, the Friendship Rose Collection. Join the design team on the Heartfelt Creations Blog today to see lots of beautiful creations made with the new collection!


Instructions for card:

Create a 6x6 card base in white cardstock.  Cut out a 6x6 panel from the Friendship Rose Paper Collection, cut off the outer patterned part of panel and cut out the center with the Cut Mat Create 2A Die, adhere frame to a peach piece of paper cut slightly larger than panel.  Cut out the Decorative Heart Die twice in white cardstock and cut off the tops, adhere one to top and bottom of center and adhere decorative center square with foam tape, as shown in photo.

Cut out the center scalloped heart die from the Decorative Heart Die in pink designer paper and adhere to card front. 

Stamp the heart from the Friendship Rose Heart Stamp Set in embossing ink and heat emboss with black embossing powder, color with Zig Markers and cut out with coordinating dies, adhere with foam strips to center of card.

Stamp the roses from the Classic Rose Cling Stamp Set in Coastal Coral, sponge with Coastal Coral and Vibrant Fuchsia, cut out with coordinating dies and sculpt with the 3D Rose Shaping Mold, add glitter.

Stamp the leaves from the Classic Rose Cling Stamp Set in Olive, cut out with coordinating dies, sponge with same, sculpt with 3D Rose Shaping Mold.

Adhere flowers and foliage as shown in photo.  


Heartfelt Creations Supplies:

Friendship Rose Heart Die

Decorative Heart Die

Friendship Rose Heart Stamp Set

Friendship Rose Paper Collection

Classic Rose Cling Stamp Set

Classic Rose Die

3D Rose Shaping Mold

Cut Mat Create 2A Die

Adhesive Foam Strips

Deluxe Flower Shaping Kit

Stack and Store Daubers-Pack of 30

Deluxe Flower Shaping Paper Pack of 25 – White

Ranger Archival Ink – Jet Black

Ranger Archival Ink – Olive

Ranger Archival Ink – Coastal Coral

Ranger Archival Ink – Vibrant Fuchsia

Rajni Chawla's Crystal Clear

Designer Dries Clear Adhesive

Hydra Sponges

Zig Markers

Other Supplies: White Cardstock, black embossing powder, embossing ink


Blessings,

Darla

Wednesday, November 2, 2022

Slimline Roses


Howdy,

One more card before next week's Heartfelt Creations release, join us today on the Heartfelt Creations Blog to get lots of inspiration!


Instructions for Card:

Create a 9.25x4 base in white cardstock.  Cut a 1.25x9.25 strip of burgundy paper from the Elegant Rose Frames Paper Collection, adhere to right side. 

Cut the lace border from the Classic Companion Border Die in white cardstock, adhere several layers together to make it thicker and adhere on top of burgundy strip.

Cut a 3x9.25 strip of rose pattern paper from the Elegant Rose Frames Paper Collection, adhere to the left side of card.

Stamp the sentiment from the Elegant Rose Sentiments Cling Stamp Set in Jet Black and cut out with coordinating die. Cut out coordinating die in Luxe Gold Cardstock and adhere offset.

Cut out an oval in white cardstock with the Eyelet Oval & Basics Large Die, size that fits sentiment and adhere with foam tape.  Adhere to card front with foam tape as shown in photo.

Stamp the roses from the Classic Rose Cling Stamp Set in Sweet Plum, sponge with same, cut out with coordinating dies and sculpt with the 3D Rose Shaping Mold, and add glitter.

Stamp the leaves from the Classic Rose Cling Stamp Set in Olive, cut out with coordinating dies, sponge with Vibrant Fuchsia and Vivid Chartreuse, sculpt with 3D Rose Shaping Mold.

Adhere flowers and foliage as shown in photo.  


Heartfelt Creations Supplies:

Elegant Rose Sentiments Die

Elegant Rose Sentiments Cling Stamp Set

Elegant Rose Frames Paper Collection

Classic Rose Cling Stamp Set

Classic Rose Die

3D Rose Shaping Mold

Eyelet Oval & Basics Large

Luxe Gold Cardstock

Classic Companion Border Die

Adhesive Foam Strips

Deluxe Flower Shaping Kit

Stack and Store Daubers-Pack of 30

Deluxe Flower Shaping Paper Pack of 25 – White

Memento Dye Ink – Sweet Plum

Ranger Archival Ink – Jet Black

Ranger Archival Ink – Olive

Ranger Archival Ink – Vivid Chartreuse

Ranger Archival Ink – Vibrant Fuchsia

Rajni Chawla's Crystal Clear

Designer Dries Clear Adhesive

Hydra Sponges

Zig Markers


Blessings,

Darla


Wednesday, October 26, 2022

Roses for Today

 Hi,

Join the Design Team on the Heartfelt Creations Blog to see tons of amazing projects!


Instructions for Card:

Create a 5x7 base in white cardstock.  Cut a 5x7 piece of pink paper from the Elegant Rose Frames Paper Collection, adhere to inside of card.

Cut the bottom half of the front of the card with the Filigree Accents Die, as shown in photo. Cut another Filigree Accents Die and adhere on top to reinforce.

Cut a piece of green designer paper to fit top half of card and adhere.

Stamp the sentiment from the Elegant Rose Sentiments Cling Stamp Set and the frame from the Stylish Rose Frame Cling Stamp Set in embossing ink and heat emboss with black embossing powder, color with Zig Markers and cut out with coordinating dies.  Adhere the frame to the top center of card with foam tape.

Cut out an oval in white cardstock with the Eyelet Oval & Basics Large Die, size that fits sentiment and adhere with foam tape in center of frame.

Stamp the roses from the Classic Rose Cling Stamp Set in Sweet Plum, sponge with same, cut out with coordinating dies and sculpt with the 3D Rose Shaping Mold, and add glitter.

Stamp the small roses from the Classic Rose Cling Stamp Set in Vibrant Fuchsia, sponge with Vivid Chartreuse and Vibrant Fuchsia, cut out with coordinating dies and sculp with the 3D Rose Shaping Mold, add stamen and glitter.

Stamp the leaves from the Leafy Accents Cling Stamp Set in Olive, cut out with coordinating dies, sponge with Vibrant Fuchsia and Vivid Chartreuse, sculpt with 3D Leafy Accents Shaping Mold.

Adhere flowers and foliage as shown in photo. 


Heartfelt Creations Supplies:

Stylish Rose Frame Die

Elegant Rose Sentiments Die

Stylish Rose Frame Cling Stamp Set

Elegant Rose Sentiments Cling Stamp Set

Elegant Rose Frames Paper Collection

Classic Rose Cling Stamp Set

Classic Rose Die

3D Rose Shaping Mold

Leafy Accents Cling Stamp Set

Leafy Accents Die

3D Leafy Accents Shaping Mold

Filigree Accents Die

Eyelet Oval & Basics Large Die

Adhesive Foam Strips

Deluxe Flower Shaping Kit

Stack and Store Daubers-Pack of 30

Deluxe Flower Shaping Paper Pack of 25 – White

Memento Dye Ink – Sweet Plum

Ranger Archival Ink – Olive

Ranger Archival Ink – Vivid Chartreuse

Ranger Archival Ink – Vibrant Fuchsia

Rajni Chawla's Crystal Clear

Designer Dries Clear Adhesive

Hydra Sponges

Zig Markers

Pastel Bead Stamens - Medium

Other Supplies: White Cardstock, foam tape, black embossing powder, embossing ink


Blessings,
Darla


Wednesday, October 19, 2022

Birthday Roses

 Hey There,

It's time for inspiration Wednesday on the Heartfelt Creations Blog, join the Design Team today on the Heartfelt Creations Blog to get inspired!

Instructions for Card:

Create a 6x6 base in white cardstock.  Cut a 6x6 panel from the Elegant Rose Frames Paper Collection, cut out the center circle with the Circle Basics Large Die. Adhere the frame to card front.

Cut out the decorative die from the Simply Elegant Centerpiece Die in white cardstock and Luxe Gold Cardstock, cut apart into four two loop sections and adhere offset to create a shadow, adhere to each corner as shown in photo.  Adhere the center circle from the 6x6 panel with foam tape.

Stamp the sentiment from the Elegant Rose Sentiments Cling Stamp Set and four rose sprigs from the Stylish Rose Frame Cling Stamp Set in embossing ink and heat emboss with black embossing powder, color with Zig Markers and cut out with coordinating dies.  Cut out an additional sentiment in Luxe Gold and adhere offset to sentiment.  Adhere sentiment with foam tape to center of circle and adhere the rose sprigs to each side of the sentiment with foam tape.

Stamp the roses from the Classic Rose Cling Stamp Set in Sweet Plum, sponge with same, cut out with coordinating dies and sculpt with the 3D Rose Shaping Mold, add a stamen to the small flowers and add glitter to all.

Stamp the leaves from the Classic Rose Cling Stamp Set in Olive, cut out with coordinating dies, sponge with Vibrant Fuchsia and Vivid Chartreuse, sculpt with 3D Rose Shaping Mold.

Adhere flowers and foliage as shown in photo.  
Heartfelt Creations Supplies:

Stylish Rose Frame Die

Elegant Rose Sentiments Die

Stylish Rose Frame Cling Stamp Set

Elegant Rose Sentiments Cling Stamp Set

Elegant Rose Frames Paper Collection

Classic Rose Cling Stamp Set

Classic Rose Die

3D Rose Shaping Mold

Simply Elegant Centerpiece Die

Circle Basics Large Die

Luxe Gold Cardstock

Adhesive Foam Strips

Deluxe Flower Shaping Kit

Stack and Store Daubers-Pack of 30

Deluxe Flower Shaping Paper Pack of 25 – White

Memento Dye Ink – Sweet Plum

Ranger Archival Ink – Olive

Ranger Archival Ink – Vivid Chartreuse

Ranger Archival Ink – Vibrant Fuchsia

Rajni Chawla's Crystal Clear

Designer Dries Clear Adhesive

Hydra Sponges

Zig Markers

Bright Bead Stamens - Medium

Other Supplies:  White Cardstock, foam tape, black embossing powder, embossing ink


Blessings,
Darla