Wednesday, September 14, 2022

Hollyhock Gate

 Hi!

It's time for the Heartfelt Creations release of the Hollyhock Garden Collection!  Join us today on the Heartfelt Creations Blog to discover lots of inspiration using this beautiful collection.

Instructions for card:

Create a card base with the outer Teardrop Lattice Gateway Die in white cardstock.  Cut a piece to fit the front with the outer Teardrop Lattice Gateway Die in sky blue paper from the Hollyhock Garden Paper Collection and adhere. Cut the decorative die in white cardstock and adhere.  Cut the center in peach designer paper from the Hollyhock Garden Paper Collection, distress with Coastal Coral. Cut the center die in sky blue and adhere to decorative center die and adhere both with foam tape.

Stamp the gate from the Hollyhock Fence Cling Stamp Set in Rich Cocoa, cut out with coordinating die and distress with same.  Cut the fence in half and adhere to each edge of card with foam tape, as seen in photo.

Stamp the large hollyhock from the Hollyhock Stem & Blooms Cling Stamp Set and the small hollyhocks from the Hollyhock Fence Cling Stamp Set in Jet Black and cut out with coordinating dies, sponge the large hollyhock with Vibrant Fuchsia and the small flowers with Buttercup and Coastal Coral, sculpt with stylus and add glitter. Adhere with foam tape as seen in photo.

Stamp the sentiment from the Cheerful Notes Sentiments Cling Stamp Set on white cardstock and cut out with the small oval in the Elaborate Oval Frames Die and adhere with foam tape as seen in photo.

Stamp the hollyhocks from the Hollyhock Petals & Leaves Cling Stamp Set in Magenta Hue, sponge with same, cut out with coordinating dies and sculpt with the Hollyhock Shaping Mold.  Add stamen and glitter.

Stamp the smallest hollyhock from the Hollyhock Petals & Leaves Cling Stamp Set in Vibrant Violet, sponge with Vivid Chartreuse and Vibrant Violet, cut out with coordinating dies and sculpt with the Hollyhock Shaping Mold.  Add glitter.

Stamp the leaves from the Hollyhock Petals & Leaves Cling Stamp Set in Olive, cut out with coordinating dies, sponge with Vivid Chartreuse, sculpt with Hollyhock Shaping Mold.
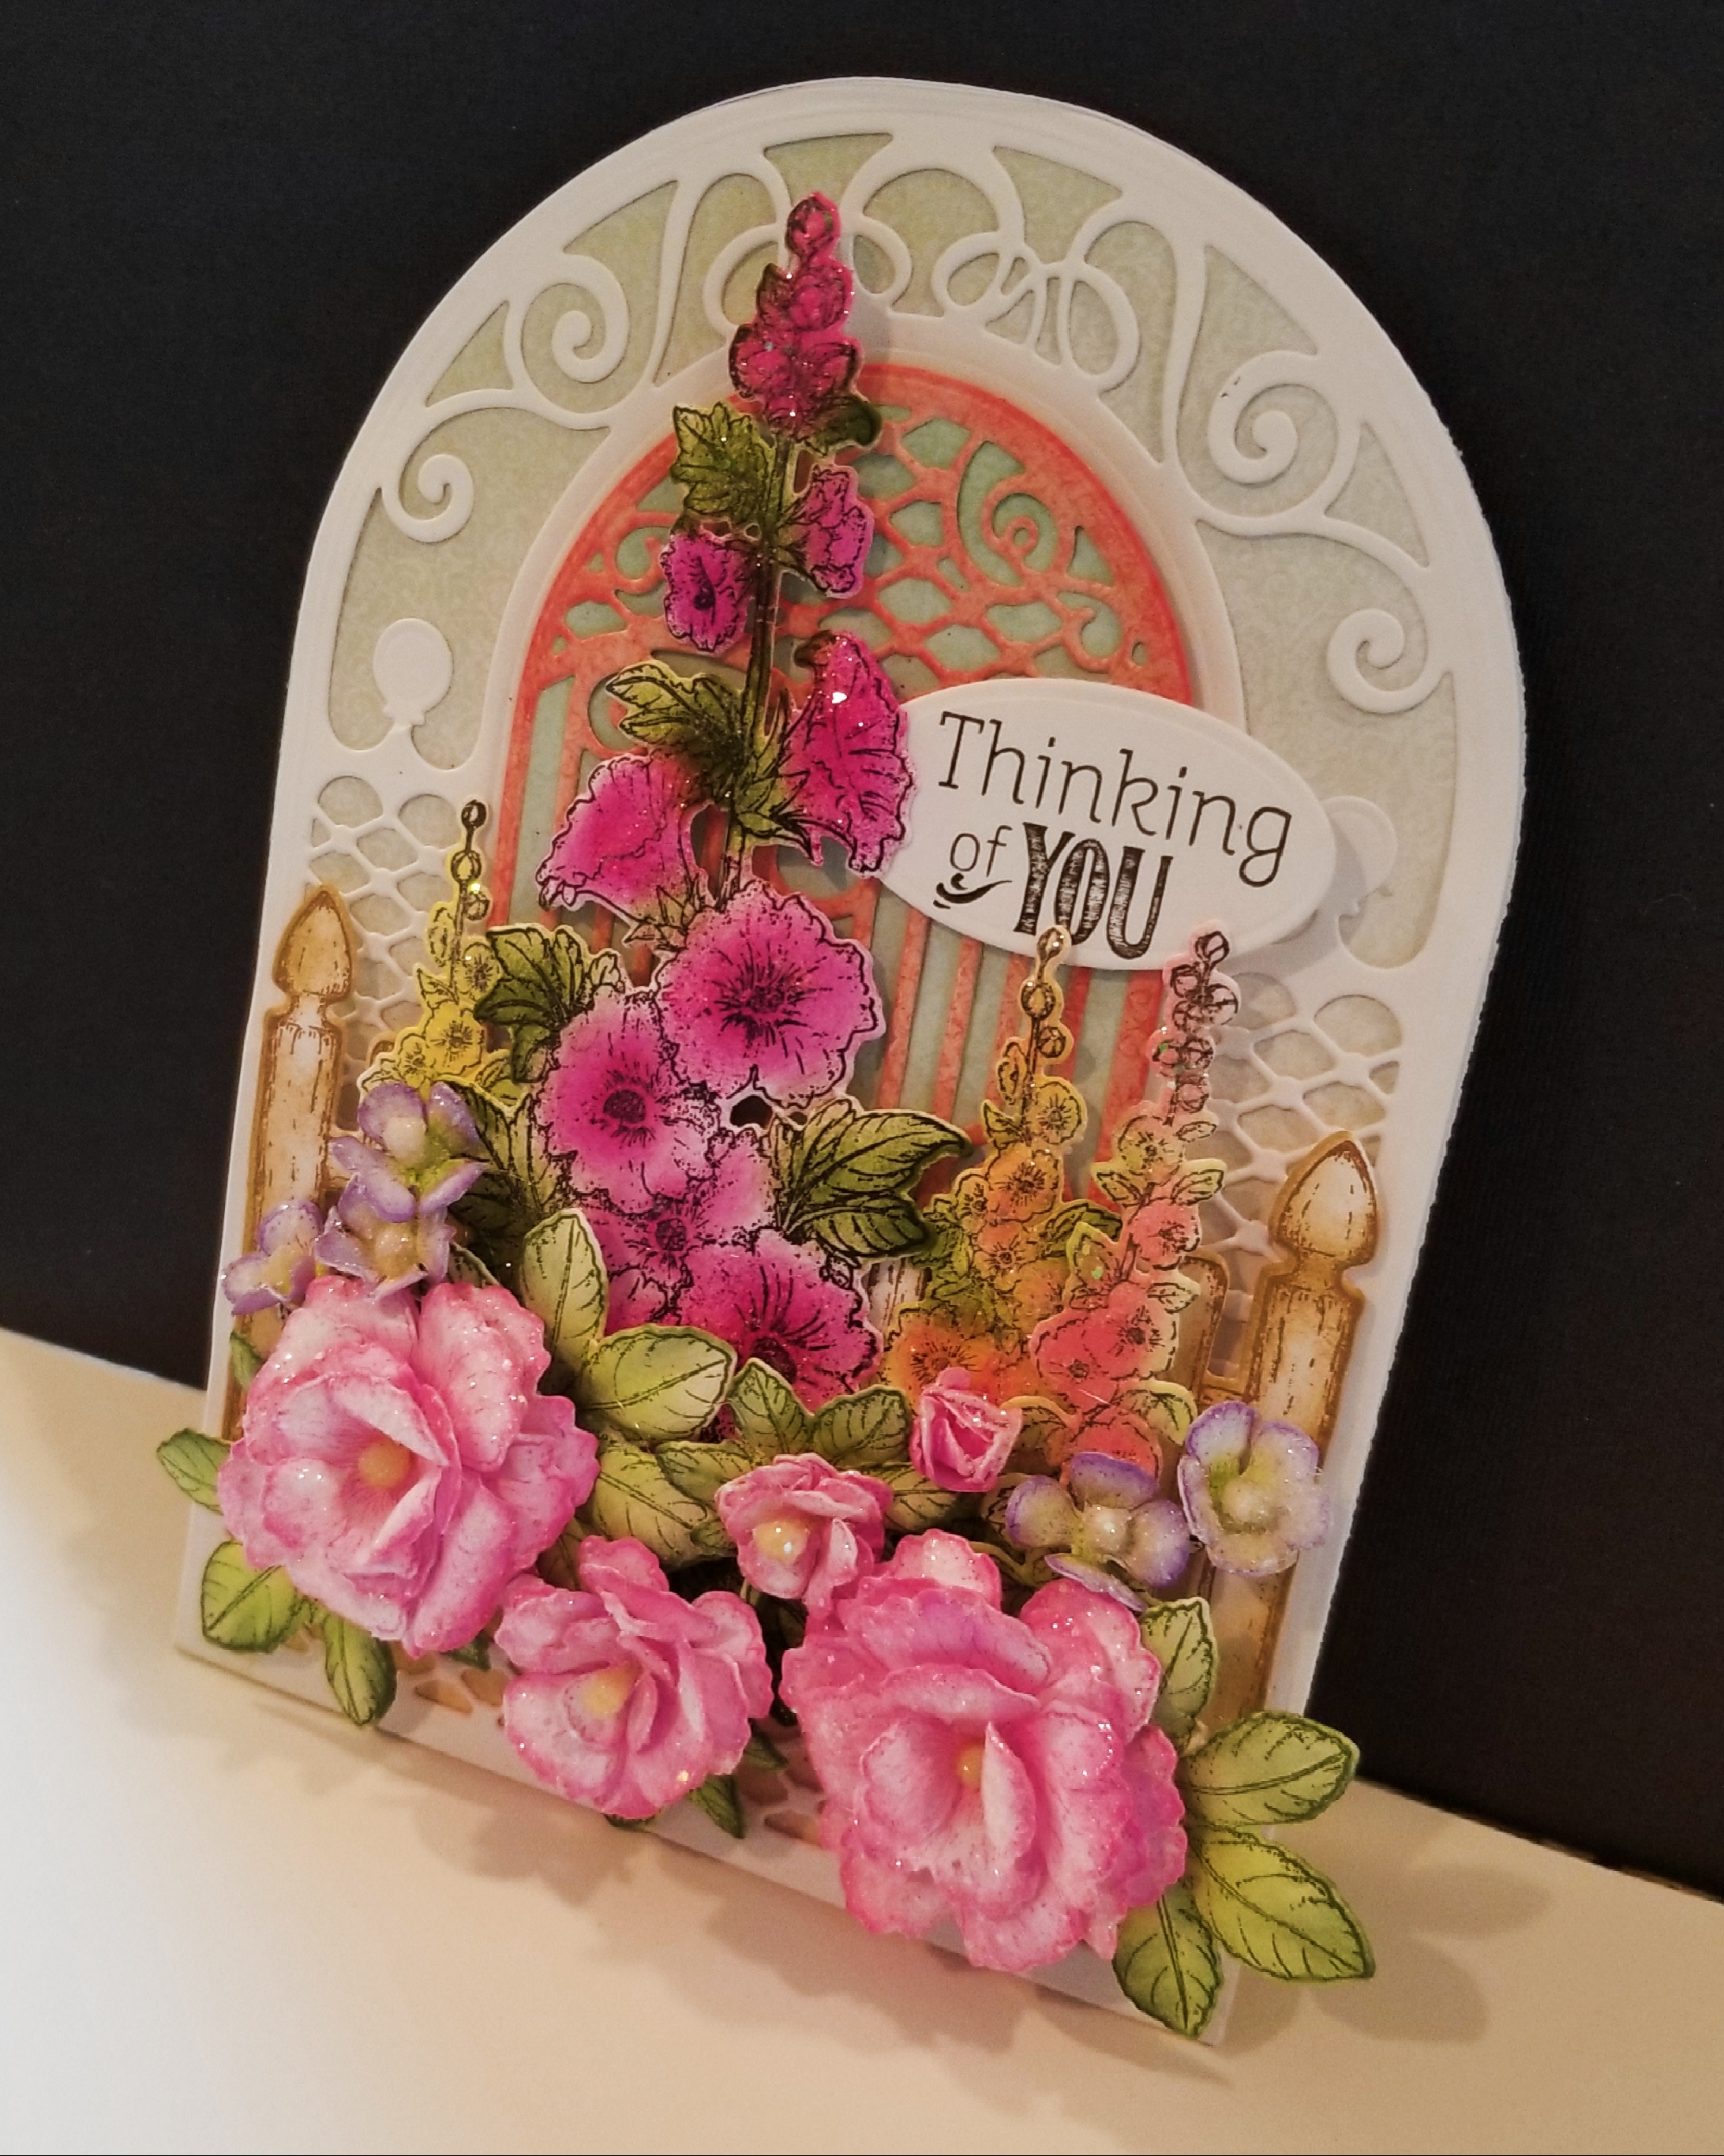
Adhere flowers and foliage as shown in photo.  

Heartfelt Creations Supplies:

Hollyhock Petals & Leaves Die

Hollyhock Stem & Blooms Die

Hollyhock Fence Die

Hollyhock Petals & Leaves Cling Stamp Set

Hollyhock Stem & Blooms Cling Stamp Set

Hollyhock Fence Cling Stamp Set

Hollyhock Garden Paper Collection

Hollyhock Shaping Mold

Cheerful Notes Sentiments Cling Stamp Set

Teardrop Lattice Gateway Die

Elaborate Oval Frames Die

Deluxe Flower Shaping Kit

Stack and Store Daubers-Pack of 30

Deluxe Flower Shaping Paper Pack of 25 – White

Ranger Archival Ink – Jet Black

Ranger Archival Ink – Olive

Ranger Archival Ink – Vivid Chartreuse

Ranger Archival Ink – Buttercup

Ranger Archival Ink – Coastal Coral

Ranger Archival Ink – Vibrant Fuchsia

Ranger Archival Ink –Magenta Hue

Stazon Ink Pad – Vibrant Violet

Memento Ink Pad – Rich Cocoa

Rajni Chawla's Crystal Clear

Designer Dries Clear Adhesive

Hydra Sponges

Assorted Bead Stamens – Medium

Other Supplies: white cardstock, foam tape


Blessings,

Darla

Wednesday, September 7, 2022

Angel in Blue

 Howdy,

It's time for some inspiration on the Heartfelt Creations Blog, join us today to see what the Design Team has created.

Instructions for Card:

Create a 5.5x7 card base with white cardstock.  Cut a 5x6.5 piece of blue paper from the Joyous Noel Paper Collection, distress with Night Sky and adhere.

Cut the Noel Decorative Die in white cardstock and adhere.

Stamp the angel, noel and harp from the Joyous Noel Cling Stamp Set in embossing ink on white cardstock, heat emboss with black embossing powder, cut out with coordinating die, color with Zig Markers, add glitter and adhere with foam tape as shown in photo. 

Stamp the small poinsettia from the Large Festive Poinsettia Cling Stamp Set in Sky Blue, sponge with same, cut out with coordinating dies and sculpt with the Large 3D Festive Poinsettia Shaping Mold.  Add silver stamens and glitter.

Stamp the holly from the Small Festive Poinsettia Cling Stamp Set in Olive, sponge with Vivid Chartreuse, cut out with coordinating dies and sculpt with the Small 3D Festive Poinsettia Shaping Mold.  Add glitter.

Stamp the leaves and flourishes from the Holly Berry Cling Stamp Set in Olive, cut out with coordinating dies, sculpt with stylus and add glitter.

Stamp the flowers from the Cottage Garden Hydrangea Cling Stamp Set in Vivid Chartreuse, sponge with same, cut out with coordinating dies and sculpt with 3D Hydrangea Shaping Mold.  Add stamen and glitter.

Adhere flowers and foliage as shown in photo.  

Heartfelt Creations Supplies:

Joyous Noel Angel Die

Joyous Noel Cling Stamp Set

Joyous Noel Paper Collection

Noel Decorative Die

Large Festive Poinsettia Cling Stamp Set

Large Festive Poinsettia Die

Large 3D Festive Poinsettia Shaping Mold

Small Festive Poinsettia Cling Stamp Set

Small Festive Poinsettia Die

Small 3D Festive Poinsettia Shaping Mold

Holly Berry Die

Holly Berry Cling Stamp Set

Cottage Garden Hydrangea Cling Stamp Set

Cottage Garden Hydrangea Die

3D Hydrangea Shaping Mold

Deluxe Flower Shaping Kit

Stack and Store Daubers-Pack of 30

Deluxe Flower Shaping Paper Pack of 25 – White

Ranger Archival Ink – Olive

Ranger Archival Ink – Vivid Chartreuse

Ranger Archival Ink – Sky Blue

Ranger Archival Ink – Night Sky

Rajni Chawla's Crystal Clear

Designer Dries Clear Adhesive

Hydra Sponges

Assorted Bead Stamens – Medium

Zig Markers

Blessings,

Darla

Wednesday, August 31, 2022

Slimeline Angels

 Hi there,

Please join the Design Team on the Heartfelt Creations Blog today for lots of beautiful inspiration!

Instructions for card:

Create a 4x9.25 card base with white cardstock.  Cut a slightly smaller piece of dark green paper from the Joyous Noel Paper Collection, distress with Olive and adhere.

Cut two panels of the French Gate Die in Luxe Gold, cut one in half and add to the other to make a strip, cut a piece of light blue designer paper to fit and adhere with foam tape as shown in photo.

Stamp the lacey border from the Elegant Mosaics Cling Stamp Set in embossing ink on Luxe Gold and heat emboss with gold embossing powder, cut out with coordinating die and adhere along right side of card against the French Gate panel.

Stamp the angels and harp from the Joyous Noel Cling Stamp Set in embossing ink on white cardstock, heat emboss with black embossing powder, cut out with coordinating die, color with Zig Markers, add glitter and adhere with foam tape as shown in photo. 

Stamp the large poinsettia from the Small Festive Poinsettia Cling Stamp Set in Pistachio, sponge centers with same, cut out with coordinating dies and sculpt with the Small 3D Festive Poinsettia Shaping Mold.  Add gold stamens and glitter.

Stamp the small poinsettia from the Large Festive Poinsettia Cling Stamp Set in Pistachio, sponge with same, cut out with coordinating dies and sculpt with the Large 3D Festive Poinsettia Shaping Mold.  Add gold stamens and glitter.

Stamp the holly from the Small Festive Poinsettia Cling Stamp Set in Olive, sponge with Vivid Chartreuse, cut out with coordinating dies and sculpt with the Small 3D Festive Poinsettia Shaping Mold.  Add glitter.

Adhere poinsettias and foliage as shown in photo.  

Heartfelt Creations Supplies:

Joyous Noel Angel Die

Joyous Noel Cling Stamp Set

Joyous Noel Paper Collection

French Gate Die

Elegant Mosaics Die

Elegant Mosaics Cling Stamp Set

Large Festive Poinsettia Cling Stamp Set

Large Festive Poinsettia Die

Large 3D Festive Poinsettia Shaping Mold

Small Festive Poinsettia Cling Stamp Set

Small Festive Poinsettia Die

Small 3D Festive Poinsettia Shaping Mold

Deluxe Flower Shaping Kit

Stack and Store Daubers-Pack of 30

Deluxe Flower Shaping Paper Pack of 25 – White

Ranger Archival Ink – Olive

Ranger Archival Ink – Vivid Chartreuse

Rajni Chawla's Crystal Clear

Designer Dries Clear Adhesive

Hydra Sponges

Assorted Bead Stamens – Medium

Zig Markers

Other Supplies: White Cardstock, embossing ink, black embossing powder, gold embossing powder, foam tape, Memento Dye Ink - Pistachio

Blessings,

Darla

Wednesday, August 24, 2022

Peaceful Angel

 Hi Friends!

Join the Design Team on the Heartfelt Creations Blog today to see tons of inspiration!

Instructions for Card:

Create a 5x7 card base with white cardstock.  Cut a 4.5x6.5 piece of dark blue paper from the Joyous Noel Paper Collection, distress Night Sky and adhere to inside of card. Cut a small portion of the front with the frame die in the Noel Decorative Die. Cut a piece of lighter blue paper from the paper collection, using the Noel Decorative Die to cut the bottom edge, distress with Night Sky and adhere.  Cut the Noel Decorative die in white and Luxe Gold and adhere offset, adhere both to bottom of top flap as shown in photo.

Stamp the angel and bird from the Joyous Noel Cling Stamp Set in embossing ink on white cardstock, heat emboss with black embossing powder, cut out with coordinating die, color with Zig Markers, add glitter and adhere to the left side of card front with foam tape. 

Stamp the leaves from the Holly Berry Spray Cling Stamp Set in Olive, cut out with corresponding dies and sculpt with stylus, add glitter.

Stamp the large poinsettia from the Small Festive Poinsettia Cling Stamp Set in Pistachio, sponge centers with Vivid Chartreuse, cut out with coordinating dies and sculpt with the Small 3D Festive Poinsettia Shaping Mold.  Add gold stamens and glitter.

Stamp the small poinsettia from the Large Festive Poinsettia Cling Stamp Set in Pistachio, sponge with same, cut out with coordinating dies and sculpt with the Large 3D Festive Poinsettia Shaping Mold.  Add gold stamens and glitter.

Stamp the holly from the Small Festive Poinsettia Cling Stamp Set in Olive, sponge with Vivid Chartreuse, cut out with coordinating dies and sculpt with the Small 3D Festive Poinsettia Shaping Mold.  Add glitter.

Adhere poinsettias and foliage as shown in photo.  
Heartfelt Creations Supplies:

Joyous Noel Angel Die

Joyous Noel Cling Stamp Set

Noel Decorative Die

Joyous Noel Paper Collection

Large Festive Poinsettia Cling Stamp Set

Large Festive Poinsettia Die

Large 3D Festive Poinsettia Shaping Mold

Small Festive Poinsettia Cling Stamp Set

Small Festive Poinsettia Die

Small 3D Festive Poinsettia Shaping Mold

Holly Berry Spray Cling Stamp Set

Holly Berry Spray Die

Deluxe Flower Shaping Kit

Stack and Store Daubers-Pack of 30

Deluxe Flower Shaping Paper Pack of 25 – White

Ranger Archival Ink – Vivid Chartreuse

Ranger Archival Ink – Olive

Ranger Archival Ink – Night Sky

Rajni Chawla's Crystal Clear

Designer Dries Clear Adhesive

Hydra Sponges

Assorted Bead Stamens – Medium

Zig Markers

Other Supplies: White Cardstock, embossing ink, black embossing powder, foam tape, Memento Dye Ink - Pistachio

Blessings,

Darla

Wednesday, August 17, 2022

Noel Angel

 Hi!

It's time for some inspiration on the Heartfelt Creations Blog, join us today to see what the Design Team has created for you.

Instructions for Card:

Create a 5x7 card base with white cardstock.  Cut the outer frame of the Royal Elegance Frames Die in light blue paper from the Joyous Noel Paper Collection and adhere to card front with foam tape. Cut the decorative die in white cardstock and adhere.  Cut the center die in Luxe Gold Cardstock, cut again in green designer paper, distress with Vivid Chartreuse and adhere offset to card front.  Cut the center die in light blue, distress with Sky Blue and adhere to center with foam tape.

Color the angel from the Starry Noel Cling Stamp Set with markers and stamp on white cardstock, cut out with coordinating dies and add glitter.  Cut out the angel with Gold Luxe Cardstock and adhere offset.  Adhere angel with foam tape.

Stamp the Noel stamp from the Starry Noel Cling Stamp Set in Night Sky, color with markers and cut out with coordinating dies.  Cut out in Luxe Gold card stock and adhere offset.  Adhere to top left corner of card.

Stamp the leaves from the Holly Berry Spray Cling Stamp Set in Olive, cut out with corresponding dies and sculpt with stylus, add glitter.

Stamp the large poinsettia from the Small Festive Poinsettia Cling Stamp Set in Sky Blue, sponge with same, cut out with coordinating dies and sculpt with the Small 3D Festive Poinsettia Shaping Mold.  Add gold stamens and glitter.

Stamp the small poinsettia from the Large Festive Poinsettia Cling Stamp Set in Vivid Chartreuse, sponge with same, cut out with coordinating dies and sculpt with the Large 3D Festive Poinsettia Shaping Mold.  Add gold stamens and glitter.

Stamp the holly from the Small Festive Poinsettia Cling Stamp Set in Olive, sponge with Vivid Chartreuse, cut out with coordinating dies and sculpt with the Small 3D Festive Poinsettia Shaping Mold.  Add glitter.

Adhere poinsettias and foliage as shown in photo.  
Heartfelt Creations Supplies:

Starry Noel Angel Die

Starry Noel Cling Stamp Set

Joyous Noel Paper Collection

Large Festive Poinsettia Cling Stamp Set

Large Festive Poinsettia Die

Large 3D Festive Poinsettia Shaping Mold

Small Festive Poinsettia Cling Stamp Set

Small Festive Poinsettia Die

Small 3D Festive Poinsettia Shaping Mold

Royal Elegance Frames Die

Holly Berry Spray Cling Stamp Set

Holly Berry Spray Die

Deluxe Flower Shaping Kit

Stack and Store Daubers-Pack of 30

Deluxe Flower Shaping Paper Pack of 25 – White

Ranger Archival Ink – Vivid Chartreuse

Ranger Archival Ink – Olive

Ranger Archival Ink – Sky Blue

Ranger Archival Ink – Night Sky

Rajni Chawla's Crystal Clear

Designer Dries Clear Adhesive

Hydra Sponges

Assorted Bead Stamens – Medium

Luxe Gold Cardstock

Other Supplies: White Cardstock, embossing ink, black embossing powder, foam tape, markers


Blessings,

Darla


Wednesday, August 10, 2022

Angels on High

 Hey!

It's time to celebrate the release of the Joyous Noel Collection on the Heartfelt Creations Blog!


Instructions for Card:

 Create a 6x6 card base with white cardstock.  Cut a 5.5x5.5 piece of green paper from the Joyous Noel Paper Collection and adhere to card front with foam tape. Cut out the French Courtyard Die in white cardstock and adhere.

Stamp the Joyous Noel Background Cling Stamp Set with Vivid Chartreuse and Sky Blue, creating an ombre effect and cut out with Simple Centerpiece Die, distress with Vivid Chartreuse.  Cut out the next larger die in dark green paper from the Joyous Noel Paper Collection, distress with Olive and adhere both layers with foam tape.

Stamp the angel and harp from the Joyous Noel Cling Stamp Set in embossing ink on white cardstock, heat emboss with black embossing powder, cut out with coordinating die, color with Zig Markers, add glitter and adhere to the bottom right of card front with foam tape.  .

Stamp the leaves from the Holly Berry Spray Cling Stamp Set in Olive, cut out with corresponding dies and sculpt with stylus, add glitter.

Stamp the large poinsettia from the Small Festive Poinsettia Cling Stamp Set in Vivid Chartreuse, sponge with same, cut out with coordinating dies and sculpt with the Small 3D Festive Poinsettia Shaping Mold.  Add gold stamens and glitter.

Stamp the small poinsettia from the Large Festive Poinsettia Cling Stamp Set in Vivid Chartreuse, sponge with same, cut out with coordinating dies and sculpt with the Large 3D Festive Poinsettia Shaping Mold.  Add gold stamens and glitter.

Stamp the holly from the Small Festive Poinsettia Cling Stamp Set in Olive, sponge with Vivid Chartreuse, cut out with coordinating dies and sculpt with the Small 3D Festive Poinsettia Shaping Mold.  Add glitter.

Adhere poinsettias and foliage as shown in photo.  

Heartfelt Creations Supplies:

Joyous Noel Angel Die

Joyous Noel Cling Stamp Set

Joyous Noel Background Cling Stamp Set

Joyous Noel Paper Collection

Large Festive Poinsettia Cling Stamp Set

Large Festive Poinsettia Die

Large 3D Festive Poinsettia Shaping Mold

Small Festive Poinsettia Cling Stamp Set

Small Festive Poinsettia Die

Small 3D Festive Poinsettia Shaping Mold

French Courtyard Die

Simple Centerpiece Die

Holly Berry Spray Cling Stamp Set

Holly Berry Spray Die

Deluxe Flower Shaping Kit

Stack and Store Daubers-Pack of 30

Deluxe Flower Shaping Paper Pack of 25 – White

Ranger Archival Ink – Vivid Chartreuse

Ranger Archival Ink – Olive

Ranger Archival Ink – Sky Blue

Rajni Chawla's Crystal Clear

Designer Dries Clear Adhesive

Hydra Sponges

Assorted Bead Stamens – Medium

Zig Markers

Other Supplies: White Cardstock, embossing ink, black embossing powder, foam tape


Blessings,

Darla


Wednesday, August 3, 2022

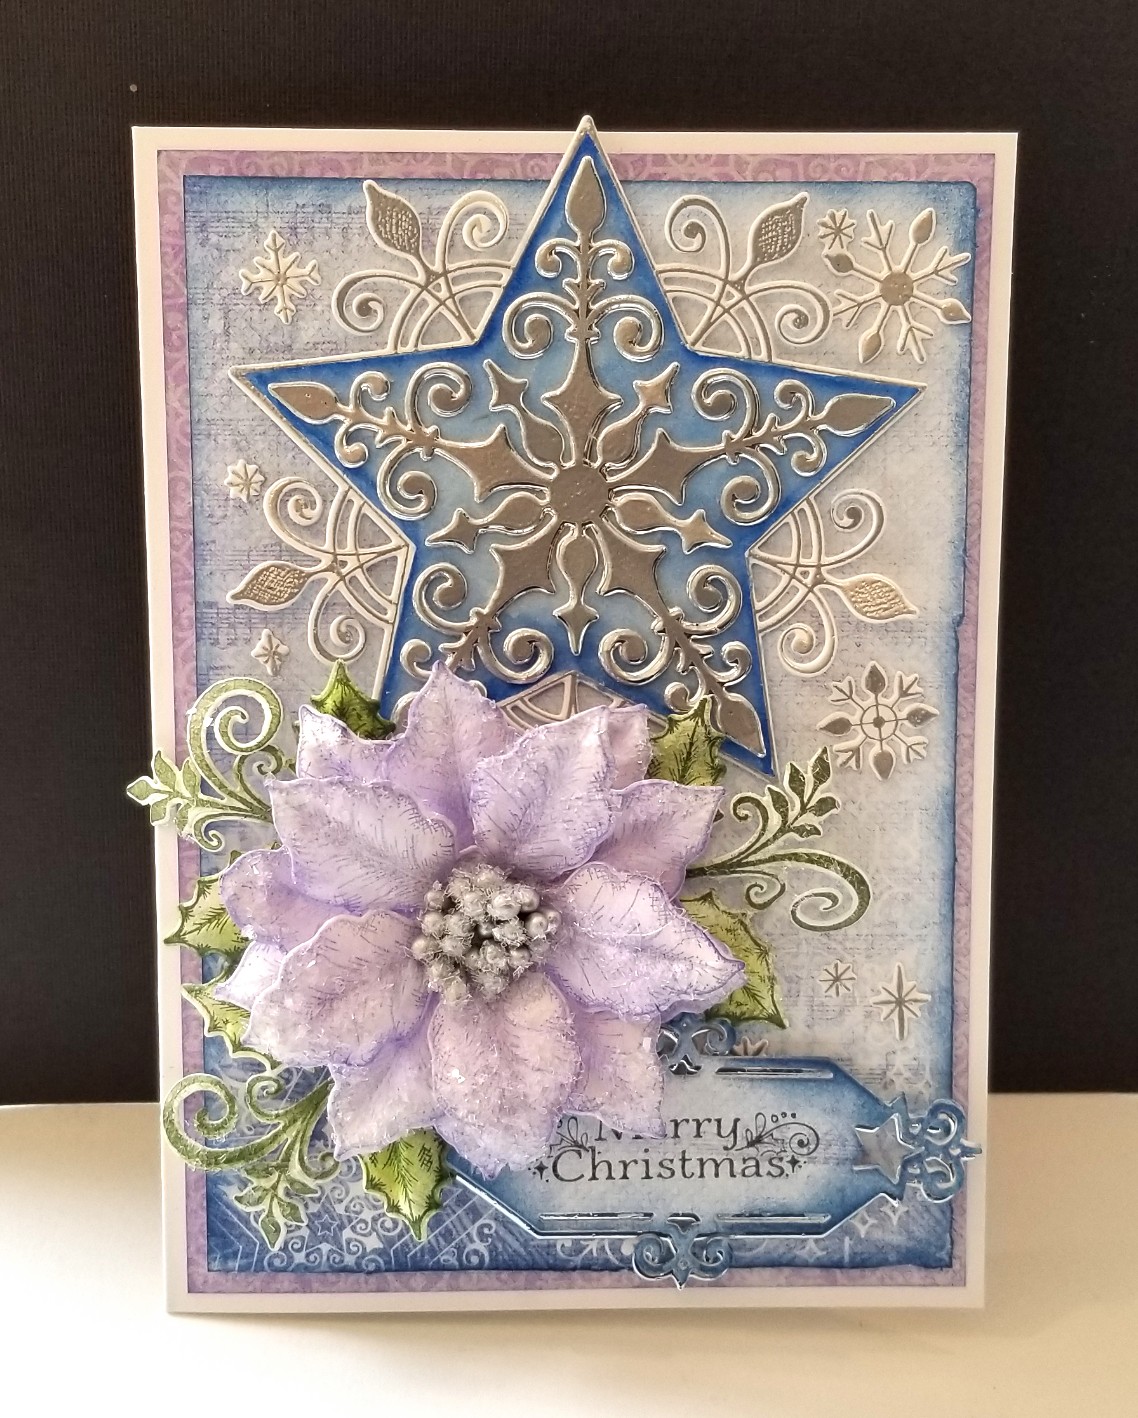
Snowflake Christmas

 Hi there!

It's another Wednesday of inspiration, join us on the Heartfelt Creations Blog to see all of the Design Team amazing creations!


Instructions for card:

Create a 5x7 card base with white cardstock.  Cut a 4.75x6.75 piece of lavender paper from the Holiday Star Paper Collection, distress with Vibrant Violet and adhere to card front. Cut a 4.5x6.5 piece of blue paper from the paper collection, distress with Night Sky and adhere with foam tape.

Stamp the decorative snowflake from the Large Holiday Star Cling Stamp Set in embossing ink on white cardstock, heat emboss with silver embossing powder, cut out with coordinating die, color with blue Zig marker and adhere to center top of card front with foam tape.  Heat emboss the center decorative stamp on Luxe Silver cardstock, cut out with coordinating die and adhere.

Heat emboss the snowflakes from the Large Holiday Star Cling Stamp Set in Silver, cut out with coordinating dies.

Stamp the sentiment from the Holiday Star Cling Stamp Set in Jet Black on blue designer paper, cut out with sentiment die from same set and distress with Night Sky. Cut out a sentiment die in Luxe Silver and adhere offset.  Adhere to bottom right on card front.

Stamp the large poinsettia from the Small Festive Poinsettia Cling Stamp Set in Vibrant Violet, sponge with same, cut out with coordinating dies and sculpt with the Small 3D Festive Poinsettia Shaping Mold.  Add silver stamens and glitter.

Stamp the holly from the Small Festive Poinsettia Cling Stamp Set in Olive, sponge with Vivid Chartreuse, cut out with coordinating dies and sculpt with the Small 3D Festive Poinsettia Shaping Mold.  Add glitter.

Adhere poinsettias, holly and snowflakes as shown in photo.  


Heartfelt Creations Supplies:

Large Holiday Star Die

Large Holiday Star Cling Stamp Set

Holiday Star Die

Holiday Star Cling Stamp Set

Holiday Star Paper Collection

Small Festive Poinsettia Cling Stamp Set

Small Festive Poinsettia Die

Small 3D Festive Poinsettia Shaping Mold

Deluxe Flower Shaping Kit

Stack and Store Daubers-Pack of 30

Deluxe Flower Shaping Paper Pack of 25 – White

Ranger Archival Ink – Jet Black

Ranger Archival Ink – Vivid Chartreuse

Ranger Archival Ink – Olive

Ranger Archival Ink – Night Sky

Stazon – Vibrant Violet

Rajni Chawla's Crystal Clear

Designer Dries Clear Adhesive

Hydra Sponges

Assorted Bead Stamens – Medium

Luxe Silver Cardstock

Other Supplies:

White Cardstock, embossing ink, silver embossing powder


Blessings,

Darla