Wednesday, June 29, 2022

Floral Gateway

 It's time for inspiration today on the Heartfelt Creations Blog, join us to see what the Design Team has created!

Instructions for card:

Create a 6x6 card base with white cardstock.  Cut a 5.75x5.75 piece of purple paper from the Mushroom Cottage Paper Collection and adhere to card front.

Cut out the French Courtyard Die in lavender paper and adhere. Cut out the inner circle die in light blue designer paper and adhere.

Stamp the vine x2 from the Large Mushroom Cottage Cling Stamp Set in olive, sponge with the same and cut out with coordinating dies, sculpt with stylus.

Stamp the flower cluster from the Mushroom Cottage Accents Cling Stamp Set in Olive, sponge with Vibrant Fuchsia and Olive, cut out with coordinating dies and sculpt with stylus.

Stamp the bug from the Mushroom Cottage Accents Cling Stamp Set in Jet Black and color with Zig markers, cut out with coordinating die.

 Stamp the Sweet Magnolia Blooms Cling Stamp Set in Vibrant Fuchsia, sponge centers with Vivid Chartreuse and the outer petals with Vibrant Fuchsia, cut out with coordinating dies, sculpt with the 3D Magnolia Shaping Mold.  Add stamens and glitter.

Stamp the leaves from the Leafy Accents Cling Stamp Set in Olive, sponge with Olive and Vibrant Fuchsia, cut out with coordinating dies and sculpt with the 3D Leafy Accents Shaping Mold.

Stamp sentiment from the Just for You Sentiments Cling Stamp Set in Jet Black and cut out with the Arrows and Banner Die.

Adhere sentiment and flowers as shown in photo.  Adhere bug with foam tape.


Heartfelt Creations Supplies:

Large Mushroom Cottage Die

Mushroom Cottage Accents Die

Large Mushroom Cottage Cling Stamp Set

Mushroom Cottage Accents Cling Stamp Set

Mushroom Cottage Paper Collection

Sweet Magnolia Blooms Cling Stamp Set

Sweet Magnolia Blooms Die

3D Magnolia Shaping Mold

Leafy Accents Cling Stamp Set

Leafy Accents Die

3D Leafy Accents Shaping Mold

French Courtyard Die

Arrows and Banner Die

Just for You Sentiments Cling Stamp Set

Deluxe Flower Shaping Kit

Stack and Store Daubers-Pack of 30

Deluxe Flower Shaping Paper Pack of 25 – White

Ranger Archival Ink – Vivid Chartreuse

Ranger Archival Ink – Olive

Ranger Archival Ink – Jet Black

Ranger Archival Ink – Vibrant Fuchsia

Rajni Chawla's Crystal Clear

Designer Dries Clear Adhesive

Hydra Sponges

Zig Markers


Blessings,

Darla

Wednesday, June 22, 2022

Special Fairy

 Hey there,

Join us today on the Heartfelt Creations Blog to see what the design team has created for you.

Instructions for card:

Create a 6x6 card base with white cardstock.  Cut a 5.75x5.75 piece of lime paper from the Mushroom Cottage Paper Collection and adhere to card front. Cut a 5.5x5.5 piece of lavender paper from the paper collection and adhere.

Cut out the Decorative Circle Frames Die in white cardstock and adhere. Cut out the inner circle die in lavender cardstock, distress with Vibrant Violet and adhere with foam tape.

Stamp the vine x2 from the Large Mushroom Cottage Cling Stamp Set in olive, sponge with the same and cut out with coordinating die, sculpt with stylus.

Stamp the cottage from the Mini Mushroom Cottage Cling Stamp Set x2, and the fairy x2 from the Mushroom Fairies Cling Stamp set in Jet Black, color with Zig markers and cut out with coordinating dies. Cut out the wings of the second fairy and attach with foam tape and add glitter. Cut out the door from the second cottage and attach with foam tape.

Stamp the Sweet Magnolia Blooms Cling Stamp Set in Vibrant Violet, sponge centers with Vivid Chartreuse and the outer petals with Vibrant Violet, cut out with coordinating dies, sculpt with the 3D Magnolia Shaping Mold.  Add stamens and glitter.

Stamp the leaves from the Leafy Accents Cling Stamp Set in Olive, sponge with Olive and Vibrant Fuchsia, cut out with coordinating dies and sculpt with the 3D Leafy Accents Shaping Mold.

Stamp sentiment from the Just for You Sentiments Cling Stamp Set in Ultramarine on white and cut out with the Circle Basics Large Die and mat with foam tape on a scallop circle cut with the Decorative Circle Frames Die.

Adhere scene, sentiment and flowers as shown in photo.  Adhere the cottage and fairy with foam tape.


Heartfelt Creations Supplies:

Large Mushroom Cottage Die

Mini Mushroom Cottage Die

Mushroom Fairies Die

Large Mushroom Cottage Cling Stamp Set

Mini Mushroom Cottage Cling Stamp Set

Mushroom Fairies Cling Stamp Set

Mushroom Cottage Paper Collection

Sweet Magnolia Blooms Cling Stamp Set

Sweet Magnolia Blooms Die

3D Magnolia Shaping Mold

Leafy Accents Cling Stamp Set

Leafy Accents Die

3D Leafy Accents Shaping Mold

Decorative Circle Frames Die

Circle Basics Large Die

Just for You Sentiments Cling Stamp Set

Deluxe Flower Shaping Kit

Stack and Store Daubers-Pack of 30

Deluxe Flower Shaping Paper Pack of 25 – White

Ranger Archival Ink – Vivid Chartreuse

Ranger Archival Ink – Olive

Ranger Archival Ink – Jet Black

Ranger Archival Ink – Vibrant Fuchsia

Ranger Archival Ink – Ultramarine

Rajni Chawla's Crystal Clear

Designer Dries Clear Adhesive

Hydra Sponges

Zig Markers

Other Supplies: White Cardstock, Stazon – Vibrant Violet


Blessings,

Darla


Wednesday, June 15, 2022

Fairy Garden

 Hi,

It's time for inspiration Wednesday on the Heartfelt Creations Blog, join us today to see lots of beautiful creations!


Instructions for card:

Create a 5x7 card base with white cardstock.  Cut a 4.75x6.75 piece of lime paper from the Mushroom Cottage Paper Collection and adhere to card front. Cut a 4.5x6.5 piece of lavender paper from the paper collection and adhere.

Cut out the corner dies from the Simply Classic Oval in white cardstock and adhere to corners, cut out the large decorative die from this set in white and adhere, use the oval die to cut out a piece of lavender blue paper and adhere with foam tape, and cut the center decorative die in white cardstock and adhere.

Stamp the vine from the Large Mushroom Cottage Cling Stamp Set and the vines x2 from the Mushroom Cottage Accents Cling Stamp Set in olive, sponge with the same and cut out with coordinating dies, sculpt with stylus.

Stamp the large mushroom x2, vine and frog from the Large Mushroom Cottage Cling Stamp Set, and the fairy x2, fence and mushrooms from the Mushroom Cottage Accents Cling Stamp set in Jet Black, color with Zig markers and cut out with coordinating dies. Cut out the wings of the second fairy and attach with foam tape and add crystal lacquer and glitter. Cut out the windows and doors from the second large mushroom and attach with foam tape to the large mushroom house.

Stamp the Sweet Magnolia Blooms Cling Stamp Set in Vibrant Violet, sponge centers with Vivid Chartreuse and the outer petals with Vibrant Violet, cut out with coordinating dies, sculpt with the 3D Magnolia Shaping Mold.  Add stamens and glitter.

Stamp sentiment from the Just for You Sentiments Cling Stamp Set in Jet Black on white and cut out with the Arrows and Banner Die.

Adhere scene, sentiment and flowers as shown in photo.  Adhere the mushroom house, fairy and frog with foam tape.


Heartfelt Creations Supplies:

Large Mushroom Cottage Die

Mushroom Cottage Accents Die

Large Mushroom Cottage Cling Stamp Set

Mushroom Cottage Accents Cling Stamp Set

Mushroom Cottage Paper Collection

Sweet Magnolia Blooms Cling Stamp Set

Sweet Magnolia Blooms Die

3D Magnolia Shaping Mold

Simply Classic Oval Frame Die

Arrows and Banner Die

Just for You Sentiments Cling Stamp Set

Deluxe Flower Shaping Kit

Stack and Store Daubers-Pack of 30

Deluxe Flower Shaping Paper Pack of 25 – White

Ranger Archival Ink – Vivid Chartreuse

Ranger Archival Ink – Olive

Ranger Archival Ink – Jet Black

Rajni Chawla's Crystal Clear

Designer Dries Clear Adhesive

Hydra Sponges

Zig Markers

3D Crystal Lacquer

Other Supplies: White Cardstock, Stazon – Vibrant Violet


Blessings,

Darla


Wednesday, June 8, 2022

Fairy Friend

 Greetings Friends!

It's time for the Heartfelt Creations release, the adorable Mushroom Cottage Collection! Join us today on the Heartfelt Creations Blog to share in the creativity.


Instructions for card:

Create a 5x7 card base with white cardstock.  Cut a 4.5x6.5 piece of lime paper from the Mushroom Cottage Paper Collection and adhere to card front.

Cut out the largest Simply Classic Rectangles Frame Die in lavender designer paper, distress with Vibrant Violet and adhere with foam tape. Cut out the decorative die from this set in white cardstock and adhere.  Use the decorative die to cut out a grassy scene from the paper collection and adhere.

Stamp three of the vines from the Large Mushroom Cottage Cling Stamp Set in olive, sponge with the same and cut out with coordinating dies, sculpt with stylus.

Stamp the mushroom houses and windows from the Mini Mushroom Cottages Cling Stamp Set, the fence and bug from the Mushroom Cottage Accents Cling Stamp Set, and two of the fairy from the Mushroom Fairies Cling Stamp Set in Jet Black, color with Zig markers and cut out with coordinating dies. Adhere the windows of the mushroom houses with foam tape and cut out the fairy wings from the second fairy and adhere with foam tape and accent with Diamond Stickles.

Stamp the Sweet Magnolia Blooms Cling Stamp Set in Vibrant Violet, sponge centers with Vivid Chartreuse and the outer petals with Vibrant Violet, cut out with coordinating dies, sculpt with the 3D Magnolia Shaping Mold.  Add stamens and glitter.

Stamp sentiment from the Just for You Sentiments Cling Stamp Set in Jet Black on white and cut out with small arrow from the Arrows and Banner Die.

Adhere scene as shown in photo, adhere fairy, sentiment and a mushroom house with foam tape.


Heartfelt Creations Supplies:

Mushroom Cottage Die

Mini Mushroom Cottages Die

Mushroom Fairies Die

Mushroom Cottage Accents Die

Large Mushroom Cottage Cling Stamp Set

Mini Mushroom Cottages Cling Stamp Set

Mushroom Fairies Cling Stamp Set

Mushroom Cottage Accents Cling Stamp Set

Mushroom Cottage Paper Collection

Sweet Magnolia Blooms Cling Stamp Set

Sweet Magnolia Blooms Die

3D Magnolia Shaping Mold

Simply Classic Rectangles Frame Die

Arrows and Banner Die

Just for You Sentiments Cling Stamp Set

Deluxe Flower Shaping Kit

Stack and Store Daubers-Pack of 30

Deluxe Flower Shaping Paper Pack of 25 – White

Ranger Archival Ink – Vivid Chartreuse

Ranger Archival Ink – Olive

Ranger Archival Ink – Jet Black

Rajni Chawla's Crystal Clear

Designer Dries Clear Adhesive

Hydra Sponges

Zig Markers

Other Supplies: White Cardstock, Stazon – Vibrant Violet, Diamond Stickles


Blessings,

Darla

Wednesday, June 1, 2022

Lovely Poppies

 Hey,

Join the Design Team on the Heartfelt Creations Blog today to see what they have created for you.

Instructions for card:

Create a 5x7 card base with white cardstock.  Cut a4.5x6.5 piece of pink paper from the Wild Poppy Paper Collection, distress with Carnation Red and adhere to card front. Cut out the largest Intricate Swirl Frames Die in white cardstock, distress with Carnation Red and adhere. Cut a pink piece of designer paper to fit inside the Intricate Swirl Frames Die, distress with Carnation Red and adhere with foam tape. Use the center rectangle die to cut out a piece of green designer paper and adhere.

Cut out the eyelet oval with the Eyelet Oval & Basics Small Die.

Stamp the vase from the Wild Poppy Bouquet Cling Stamp Set in Jet Black, color with Zig markers and cut out with the Eyelet Oval & Basics Small Die. Adhere to Eyelet Oval with foam tape. Adhere to left side of card front.

Stamp the Wild Poppy Cling Stamp Set in Carnation Red, sponge with same, cut out with coordinating dies, sculpt with the Wild Poppy Shaping Mold.  Stamp the center of the poppy with Olive and cut out, sponge with Buttercup.  Add black prills to the flower center, adhere flower center circle with foam tape as shown in photo, add glitter.

Stamp the buds from the Wild Poppy Accents Cling Stamp Set in Olive, sponge with Vivid Chartreuse, cut out with coordinating dies and sculpt with a stylus and add glitter.

Stamp sentiment from the Cheerful Notes Sentiments Cling Stamp Set on designer paper and cut out with Cut Mat Create 1B Die.

Adhere flowers and sentiment as shown in photo.
Heartfelt Creations Supplies:

Wild Poppy Die

Wild Poppy Accents Die

Wild Poppy Bouquet Die

Wild Poppy Cling Stamp Set

Wild Poppy Accents Cling Stamp Set

Wild Poppy Bouquet Cling Stamp Set

Wild Poppy Paper Collection

Wild Poppy Shaping Mold

Intricate Swirl Frames Die

Eyelet Oval & Basics Small Die

Cut Mat Create 1B Die

Cheerful Note Sentiments Cling Stamp Set

Deluxe Flower Shaping Kit

Stack and Store Daubers-Pack of 30

Deluxe Flower Shaping Paper Pack of 25 – White

Ranger Archival Ink – Vivid Chartreuse

Ranger Archival Ink – Buttercup

Ranger Archival Ink – Olive

Ranger Archival Ink – Jet Black

Ranger Archival Ink – Carnation Red

Rajni Chawla's Crystal Clear

Designer Dries Clear Adhesive

Hydra Sponges

Zig Markers

Other Supplies: White Cardstock, foam tape, seam binding ribbon, black prills


Blessings,

Darla


Wednesday, May 25, 2022

Poppy Gate

 Howdy,

It's time for Inspiration Wednesday on the Heartfelt Creations Blog, join us to see what the design team has created for you.

Instructions for card:

Create a 6x6 inch card base with white cardstock.  Cut a 5.5x5.5inch piece of peach paper from the Wild Poppy Paper Collection, adhere to card front. Cut out the French Gate Die in green designer paper, distress with Olive and adhere.

Cut out the hinges from the Window Hinges Die in green designer paper and adhere to gate as shown in photo.

Stamp the Wild Poppy Cling Stamp Set in Bright Tangelo, sponge with the Bright Tangelo and Coastal Coral, cut out with coordinating dies, sculpt with the Wild Poppy Shaping Mold.  Add stamens to the center of the flowers and black prills around the stamens.  Add glitter.

Stamp the buds from the Wild Poppy Accents Cling Stamp Set in Olive, sponge with Vivid Chartreuse, cut out with coordinating dies and sculpt with a stylus and add glitter.

Stamp the flowers from the Floral Butterfly Accents Cling Stamp Set in Olive, cut out with coordinating die and sponge with Vivid Chartreuse and Bright Tangelo. Add glitter.

Stamp sentiment from the Cheerful Note Sentiments Cling Stamp Set on white cardstock and cut out with the Arrows and Banner Die, distress with Coastal Coral.

Adhere flowers and sentiment as shown in photo.
Heartfelt Creations Supplies:

Wild Poppy Die

Wild Poppy Accents Die

Wild Poppy Cling Stamp Set

Wild Poppy Accents Cling Stamp Set

Wild Poppy Paper Collection

Wild Poppy Shaping Mold

Floral Butterfly Accents Cling Stamp Set

Floral Butterfly Accents Die

French Gate Die

Window Hinges Die

Cheerful Note Sentiments Cling Stamp Set

Arrows and Banner Die

Deluxe Flower Shaping Kit

Stack and Store Daubers-Pack of 30

Deluxe Flower Shaping Paper Pack of 25 – White

Ranger Archival Ink – Vivid Chartreuse

Ranger Archival Ink – Olive

Ranger Archival Ink – Jet Black

Ranger Archival Ink – Bright Tangelo

Ranger Archival Ink – Coastal Coral

Rajni Chawla's Crystal Clear

Designer Dries Clear Adhesive

Hydra Sponges

Assorted Bead Stamens - Medium

Other Supplies: White Cardstock, foam tape, black prills


Blessings,
Darla


Wednesday, May 18, 2022

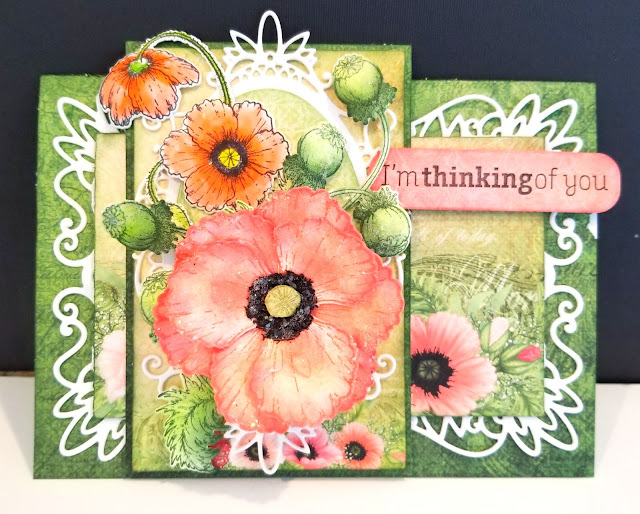
Thoughtful Poppies

 Hey there,

It's time for some inspiration on the Heartfelt Creations Blog, join us there to see what the design team has created for you!

Instructions for card:

Create a 5x7 card base with white cardstock.  Cut a 5x7inch piece of green paper from the Wild Poppy Paper Collection, adhere to card front. Cut out the largest Royal Elegance Frames Die in white cardstock and adhere. Cut a floral piece of designer paper to fit inside the Royal Elegance Frames Die, distress with Olive and adhere with foam tape.

Cut a 3.25x5.25 inch piece of floral designer paper and adhere with foam tape to a green piece cut slightly larger for a mat.

Cut the oval inner die of the Royal Elegance Frames Die in white cardstock and adhere, as shown in photo. Cut the oval Eyelet Oval & Basics Large Die in green designer paper and adhere with foam tape.

Stamp the Wild Poppy Cling Stamp Set in Bright Tangelo, sponge with the Bright Tangelo and Coastal Coral, cut out with coordinating dies, sculpt with the Wild Poppy Shaping Mold.  Stamp the center of the poppy with Olive and cut out, sponge with Buttercup.  Add black prills to the flower center and add the Olive center circle to the flower with foam tape as shown in photo, add glitter.

Stamp the buds from the Wild Poppy Accents Cling Stamp Set in Olive, sponge with Vivid Chartreuse, cut out with coordinating dies and sculpt with a stylus and add glitter.

Stamp the flowers from the Wild Poppy Bouquet Cling Stamp Set in Jet Black cut out with coordinating dies, color with Zig markers, sculpt with stylus.

Stamp sentiment from the For My Friend Sentiments Cling Stamp Set on designer paper and cut out with Cut Mat Create 1A Die.

Adhere flowers and sentiment as shown in photo.

Heartfelt Creations Supplies:

Wild Poppy Die

Wild Poppy Accents Die

Wild Poppy Bouquet Die

Wild Poppy Cling Stamp Set

Wild Poppy Accents Cling Stamp Set

Wild Poppy Bouquet Cling Stamp Set

Wild Poppy Paper Collection

Wild Poppy Shaping Mold

Floral Butterfly Accents Cling Stamp Set

Floral Butterfly Accents Die

EZ Stem Floral Wire

Royal Elegance Frames Die

Eyelet Oval & Basics Large Die

For My Friend Sentiments Cling Stamp Set

Cut Mat Create 1A Die

Deluxe Flower Shaping Kit

Stack and Store Daubers-Pack of 30

Deluxe Flower Shaping Paper Pack of 25 – White

Ranger Archival Ink – Vivid Chartreuse

Ranger Archival Ink – Buttercup

Ranger Archival Ink – Olive

Ranger Archival Ink – Jet Black

Ranger Archival Ink – Bright Tangelo

Ranger Archival Ink – Coastal Coral

Rajni Chawla's Crystal Clear

Designer Dries Clear Adhesive

Hydra Sponges

Zig Markers

Other Supplies: White Cardstock, foam tape, seam binding ribbon, black prills


Blessings,

Darla